Friday, December 28, 2012

calendula: from garden to salve


well, this post was a long time in the making, let me tell you! I included several varieties of edible flowers in the garden this summer, to give our salads a pretty kick every time we had company - and we had loads and loads of them this year! Between the pansies and the tangete marigolds and the bachelor's buttons and the calendula, we had edible flowers coming out of our ears! And I started wondering - what else could we do with them, besides EAT them? With a little poking around the internet, I realized I could be preserving the calendula plants (which were prodigious in the garden) to make a lovely salve for dried and chapped winter skin . I have many friends who struggle with eczema and just as many friends with new babies whose bottoms need soothing, so it seemed like the perfect project! Thus, this long process began:
 
 
I gathered all the calendula blossoms I could for months, drying them on an old window screen (which I'd freshly scrubbed) sitting on some empty flowerpots in my kitchen, where they could slowly dry out of direct sunlight. Soon, the whole screen was pretty much full. As soon as the flowers were fully dried and crisp, I removed the petals and placed them in this glass Weck canning jar. I took off the rubber seal and one of the clips so that no moisture would build up in the jar as I gathered my petals over the summer. There's a piece of parchment tucked under the lid to help absorb any moisture that might develop. I kept this jar in a dark cupboard, taking it out every few weeks to add more dried petals.
 
Our sunny summer weather lasted through October this year, so I didn't start infusing (olive) oil with the petals until November. At first, I perched the glass jar of oil and petals (approximately 2 parts oil to 1 part petals) in the window, hoping that the weak winter sun would slowly warm the oil each day and help infusion. When I realized that not much was happening, I set the jar down in the dark, in front of a heating vent, which warmed it better. Still, I let my petals infuse for over a month - and then heated the oil on the stove for an hour at the end of all that to really make sure I'd gotten all the good stuff out of the petals that I could.

 
I strained the petals out of the oil using a piece of cheesecloth set over a metal strainer. Then it was time to add beeswax. I measured my oil:I had between 2.25 and 2.5 cups of oil. I used three of these 1.5 oz pats of beeswax from Big Dipper waxworks, a local beeswax company (so, 4.5 oz total - I was following this recipe that states that you want to use about 4 parts infused oil to 1 part beeswax to make salve). I grated the three pats on a regular cheese grater and then added them into the oil on the stove. If you are interested in making salve and are allergic to beeswax, there are other natural oils that you can use to thicken up your oil: try shea butter or cocoa butter. Here in Seattle, these products can be found at Dandelion Apothecary in Ballard. Many natural food/natural lifestyle supply stores will carry these oils and waxes.
 
Heat the oil and wax over the lowest possible heat setting or use a double boiler to prevent scorching. Stir frequently, and attend the wax constantly. As soon as the wax has entirely melted into the oil, give the whole lot a good stir or two. Now is the time to add a bit of essential oil to scent if you would like. Mountain Rose Herbs (their recipe linked above) recommends adding 40 drops (per half cup oil - so since I'm doing a quadruple batch here, 80 drops) of lavender essential oil as it will help act as a natural preservative. I didn't have lavender on hand, but I did have bergamot oil, which is also beneficial in a salve like this as it has natural antiseptic and antifungal properties. However, it's quite potent (like lavender oil, I should add), so I only added 40 drops to the whole batch.
 
Now, I should probably mention that I have a metal pan, a metal bowl, and a glass measuring cup which I've devoted entirely to use with beeswax. If you are thinking about making salve, I highly recommend picking up some tools that you can reserve for just this purpose (or this and candle-making!). I found mine at Goodwill for a couple dollars.
 
 
I then poured the hot liquid into a glass measuring cup (with a spout) and used a small funnel to pour it into my tins to set. I actually didn't have nearly enough tins, so tonight I'm going to experiment with either whipping the remaining salve and then transferring it into new tins, or else remelting and repouring it - I have a 16 oz mason jar full absolutely to the brim with leftover salve! (Actually, it's a good thing - so many of my friends want to try this out, and now I'll be able to send a tin to everyone!)
 
The little glass vial next to the tins is full of infused calendula oil for a friend who is sensitive to waxes and butters, and who is interested to try calendula's healing, calming properties on her own skin. I bought this at Dandelion as well (it has a little rollerball/roll-on applicator top inside) and just poured off some of the oil for her before I measured out the rest for the salve.
 
So! Almost ready to ship out, and then we'll see if this experiment was truly a success or not - I'll decide whether to embark on this long process again next year based on whether I get demands for more salve in 2013.


Wednesday, December 26, 2012

handmade holidays: natural beauty

for a sweet friend who is also a natural beauty (well, aren't we all, really, ladies?): silver earrings made with faceted dyed jade teardrops, garnets, and the teensiest-tiniest smattering of carnelian stones.

Tuesday, December 25, 2012

handmade holidays: let the anvil ring

 
loved this look so much that I made a pair for myself, too! They're hand-hammered satin-finish brass earrings with gold-plate earwires. Though they're large (this pair is about 3" long), they don't weigh a thing. I love how easily they swing in my ears, light as a feather.

Monday, December 24, 2012

handmade holidays: milestones and memories


In January, my maternal grandmother turns 90. Ninety. Isn't that amazing? What an accomplishment. Unbeknownst to her (good thing she's not on the internet - er, that I know of!), a large contingent of us are gathering together on the 29th to surprise her and celebrate together. I'm bringing a couple of fruitcakes that I made and aged this year (my first attempt at following in my grandfather's footsteps), and this pin.

How my grandfather ended up living and gardening in New Mexico while my grandmother stayed in Oregon with us is a long story. Suffice to say, it happened. In the 1990s, my grandmother went down to visit him a number of times, and when she returned, she would always have a new set of beaded earrings or a new beaded necklace or something. I remember how much she loved this set of beaded earrings with garnets (her birthstone) in them. So, to honour her 90th birthday, I decided to make her a new beaded piece with that same Southwest feel. I couldn't find a good garnet cabochon, as I was limited (by time) to searching shops in town instead of hunting on the internet. This turquoise seemed a good substitute. The black seed beads are glass, but all the other beads are semi-precious stone: carnelian (orange), coral (pink and red), garnet (dark red - a bit hard to make out, but they lie inside the ring of pink coral) and amazonite (pale blue). I do hope she likes it; it was really fun to do some sewn beadwork and peyote work again - it's been so long, I'd forgotten how soothing and satisfying this work is to do.

In fact, it inspired another beaded present, that I'll have to show you once I finish getting the backing on! More to come! Happy holidays, everyone!

Sunday, December 23, 2012

handmade holidays: lookin' sharp!

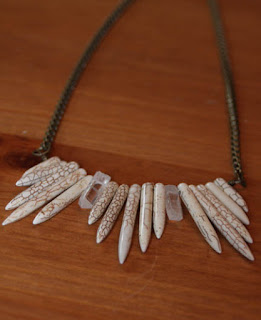
I saw a picture of a necklace like this this summer and it blew my mind. What a gorgeous idea! It's made of howlite spears, quartz points, and brass box chain. I love this; made one for a girlfriend and one for me (couldn't resist)!

Saturday, December 22, 2012

handmade holidays: architectural tradition

Cass' annual arch t-shirt is done! I only managed to make one for him this year - but he likes it, so ok! The design is a motif from the sidelight window in the George Blossom House in Chicago (a Frank Lloyd Wright house). I made a paper stencil and affixed it using repositionable spray adhesive (it's meant for photo albums, but it's super for one-time paper stencils - it doesn't leave a residue on the shirt, and afterwards, I just tear the stencil away and heat-set the paint). I applied three good solid coats of paint over three days, just like I did last year (the red print on grey), because I've found that really holds up to repeated washings and wearings.

Cass says it looks like the logo for some kind of superhero organization ... from the 70s. But he's down with that.

Friday, December 21, 2012

handmade holidays 2012: the memory of a star


in one of the tests my friend underwent earlier this year, her full body scan "lit up like a star" at her throat, where she'd developed a malignant tumour on her thyroid. Pretty, but deadly. She had mentioned she'd like something starry to commemorate her survival, but it took me a long time to figure out what to make. I sent a trio of chokers earlier this year, to cover the scar while she gets used to it (I've always thought scars were interesting; they're like writing on the pages of our bodies - they tell a story of survival and endurance), and this is going to her for yuletide, for when she no longer feels she needs to cover it up. Made of faceted onyx and vintage West German glass beads, it features faceted solar quartz stones, a silver donut, and a large dyed agate stone with a fringe of amythests (with starry bead caps) and silvery star charms. A celebration of life, and the memory of that excised fatal star.

Thursday, December 20, 2012

handmade holidays 2012: bullet casing and quartz necklaces

 
I really like the look of old bullet casings used as bezels or settings for pendants, especially when the pendant is a crystal or a bit of deer horn, natural materials. I like the smooth, industrial lines of the bullet casing and the old brass colour. 
 
 
When I came across these etched bullet casings at one of my local bead shops, my mind was really blown; they were so pretty, it was really hard to choose between patterns! They were a bit pricey, but I couldn't resist. I picked out one for a friend and one for myself. Fortunately, I still have a number of quartz points on hand (one of my bead stores sold me one strand, ONCE. It has been impossible to find drilled quartz points otherwise - there must be a real run on them in the craft world these past few years). I fiddled about until I found two that fit the bullet casings and then simply set them with epoxy and let them cure overnight. boom! done! =)
 
I hung hers from a nice brass chain, since it is a yuletide gift; I didn't have any other delicate chain around, so I strung my own on leather thong with a brass hook to close it.
 

My husband observed that this is a very "swords into ploughshares" aesthetic. I think I like it even more since he said that. I think I like these etched casings even more than the standard smooth ones.

more projects on the way - a bit late this year, but it's been a really hectic quarter. I'm juggling several projects right now, trading off nights stitching, beading, hammering metal. All my yule presents will be late this year - oh well! It's the love that counts, right?