Showing posts with label crafts. Show all posts

Saturday, September 26, 2015

stones for my hair


I saw this beautiful photo of an Elemental Child crystal crown tucked into a French twist last year and wanted to do something similar. Only, since I'm unlikely to put my hair up into a French twist (ever - I usually do a pile of sculptural curls at the nape of my neck, if I do anything at all), I decided to separate mine into individual combs.

This is the first set I made. I haven't worn them yet (no occasion for fancy updos when one is moving!), but I hope to, soon. I'm debating whether I'll tuck these into my hair at my workplace's fundraising gala in October  - the alternative would be donning my favorite fascinator/tiny pillbox hat from Spain. Ah well, the holidays bring plenty of opportunities to play dress-up (and I intend to take advantage of them!).


I plan to dabble with a few more of these in the future; I have smaller crystals to try (I wanted my first set to mimic the scale of the original photo as much as possible, though), and diminuitive one-inch-wide combs, to experiment with scale. Using both might yield darling results for a child!

Saturday, July 11, 2015

A bag for Gaia


This, too, was meant to be a Yuletide gift. Boy, was I late.

My friend was pregnant at the time - she's since given birth to her son, and fortunately I did manage to get this to her a week or two before the birth, which was my aim (the "hard deadline").

When I started in November; she was quite pregnant already (big baby this time around!), and I was thinking how wonderfully suited my friend is to pregnancy. I think of her as a water spirit, but she was so perfectly at home as this grounded mother, growing heavy with child. So I began to bead a sort of mandala pattern for her, all in blues and greens, studded with lapis and jade.


I stitched together a kind of medicine bag from softest back suede; the bag is maybe ...5 or 6 inches wide by about 8 inches long, I think? I don't quite remember. The entire bag is edged in tiny seed beads of palest lavender. One on every stitch.

I made a very long, 4-strand braided strap from leather, so the bag could easily be slung, messenger-style, diagonally across the body and hang at the hip. I left long fringes hanging and weighted them with silver beads to help them swing just right. My fingers turned black from working all those dyed skins.

I wanted it to be a gift to bring sweetness and light, so I stuffed it with a sage smudge, palo santo sticks, lavender balm and special soap, tea for breastfeeding mothers, etc. And off it goes. Not much to say about this; it's just a pretty thing I made for a friend whom I love and it turned out quite perfect!


Sunday, July 5, 2015

Another architecture tee


2015 is my year of the WIP (Works-in-Progress), by which I mean, working on finishing up old WIPs (and jettisoning those projects that I'm never going to finish). And there are PLENTY of these thing banging around the house. SO MANY IDEAS, never enough time for them all. But as Cass and I finally make progress toward entering the housing market (as first time buyers), I'm trying to adopt an attitude of "we're moving" and use that to motivate some streamlining in all aspects of our lives: cleaning out the fridge and freezer of old unused food, cleaning out our closets, and yes, even cleaning out baskets of projects.

In the interest of finishing up old works-in-progress, I printed this shirt for Cass some time ago; it was meant to be a yuletide gift, but ... I don't know what happened, exactly. I made this screen years ago, and printed him a blue-and-black Aalto tee then. He'd worn that shirt out, so it was time for a new one. Simple as that, really. He's happy as a clam to have an Aalto shirt again. This print is one of his favorites.

I also finished another originally-intended-as-a-yuletide gift in mid-June. I'll try and get it up on the blog this week; I would've posted sooner, but a business trip to Cleveland, followed by Midsommar, followed by a rush proofreading job and the 4th of July have absorbed my last three weeks in a constant state of busy-rush-rush.

I think I've earned a bit of a summer break: time for less rush-rush and a bit more summer reading and beading in my near future, I hope! Oh, and quilting, too - I want to finish the Rabbit in the Moon quilt this summer and give it away. With full time work and part time freelancing, I think I can safely say that Months and Years is officially going back on the shelf of Dreams for When I Have Time. Oh, I'll keep making beautiful small things for little people, but I think I'll just go back to giving them away instead of trying to build a collection of them to sell together.

Sunday, May 10, 2015

Finally.


Hello!

Wow, things have been quiet around here. April (and May) are, as it turns out, really busy months for my new professional career. In fact, I've been pushing myself so hard at work that I've actually been sick (very sick) for the past two weeks with a bad headcold.


While it's rather boring to sit around blowing your nose and coughing and drinking tea and binge-watching Netflix because you're too tired and worn out to read a book or think or go for a walk in the beautiful sunny weather, the whole sitting-on-the-couch-under-many-blankets business is very conducive to finishing small handicrafts like handsewn felt rabbits.

This rabbit's name is Maggie.


Maggie is actually a kit made by the clever, magical Alicia Paulson of the blog Posie Gets Cozy. (one of my all-time favorite corners of the web; I've been following along with Alicia for, gosh, maybe even 10 years now? Time flies.) Here's a link to go scope the pattern out if you'd like to make one for yourself. There are a whole bunch of other animals now: a cat and a mouse and a deer and even a fox, each with their own charming little outfits. Maggie's ears are lined with cute pink Liberty fabric, and she wears a Liberty peasant dress and a little handknit capelet (I got help on that one from my MIL) and lace-up felt boots.

Maggie is rather patiently enduring being folded a little tightly and stuffed in a box at the moment; she's headed up North to meet the youngest member of my husband's family this week, whom I hope enjoys playing with her even more than I did this afternoon! =)

More works-in-progress being finished up this week; I have at least another post ready to go. Is this my return to blogging? Yeesh, let's hope so. I can't believe how dusty it's gotten around here.

Monday, January 12, 2015

looking ahead


Here's news - though anyone reading this blog has probably already seen my update on facebook, or been called, etc. - I finally landed a stable job (it's been nearly two years). I have about a week before my first official day, so in the meantime I'm finishing up some projects, finally enjoying the time off because I can stop worrying about money for the first time in years.

Here's one of the projects I'd been meaning to do for almost a month now! I came across this "Deer Moon Necklace" by Three Arrows Leather in the late autumn, and knew I wanted to make one like it. I actually found a great new source for nice quartz points: children's toy stores - specifically, ones that carry rock specimens for young collectors. I stocked up over the holidays, so perhaps I'll be making a few more of these (girlfriends for whom I regularly make jewelry, let me know if you want one!). I opted for turquoise deerskin lace to make the braid and the straps, instead of black - because I realize that a lot of the jewelry I'm making for myself lately involves rugged natural materials and then black or brown leather (or brass metal fittings). And I'm wearing more neutral clothing, too - so this is a little bit of a reaction against the rut! I also love wearing turquoise accents in the summer, so this is a nice way to look ahead to the summer months to come.

I added some silver tone metal beads from Africa (leftover from when I made that medicine pouch), and I'm all set! My necklace also hangs a bit higher than the original, as I find necklaces that hang too low bothersome.

Friday, January 2, 2015

handmade holidays 2014: gold and pearl earrings


Okay, so actually, I haven't mailed this pair of earrings yet. But I will! Soon! Um, I promise! =) Loosely inspired by some of the gorgeous work of artisan jeweler Julie Cohn (explore her work on her website here), this pair of earrings features an organic, dimpled gold bauble and dangling black keshi pearls (with a pretty rosy/coppery cast to them). And another confession: I liked these so much that I made an identical pair for myself. Yeah, no one's really surprised by that one, huh?

Thursday, January 1, 2015

handmade holidays 2014: leather medicine bag with labradorite pyramid


So here's the thing about sending your presents out late: you can't post them 'til even later. This is ridiculous; December was kind of a non-event on the blog, huh? I don't often go in for New Year's resolutions, but maybe I should this year, and strive to make the blogging a more regular thing again. I really want to get back to blogging at least once a week - and not drop off the face of the earth and ride the coattails of a few super-productive weeks earlier in the year!

But let's get down to business. This turned out beautifully. I was so pleased with it. My inspiration was this "Miakoda Medicine" bag by Three Arrows Leather. My version is made from heavy wine-colored suede (the prettiest option of all of the scrap-leather bags at my local Tandy Leather store) that I hand-sewed together with a glover's needle and heavy waxed thread, with braided black leather lace for the necklace and fringe. I mounted a labradorite pyramid with pretty blue fire that I found on etsy into the flap (golly it's big - and kinda sharp at that point!), and worked silver-colored metal beads onto the fringe.

I loved making this - and I love the look of the pyramid stone set in the leather. I'd love to try my hand at making a big bag with multiple stones set in the flap sometime, like some of the purses that Three Arrows has for sale. It's such a great, simple idea for embellishment - and it looks amazing!

Saturday, December 20, 2014

handmade holidays 2014: crushed pyrite


As soon as I saw the etsy listing for a bag of crushed pyrite, I knew I had to have it! I wanted to play with it and see what I could come up with! I still have more to play with, too. So who knows what else I'll put together. But these earrings were made for a friend whose pinterest feed this autumn included some sparkly druzy earrings. I know that pyrite isn't druzy, but it's got a similar effect: nubby nuggets of sparkling stone, different bits catching the light at different angles. These are mounted on brass bases with gold-plated ear wires. I really love the look and the way the ring of brass around the outside of this blank provides a kind of frame, neatening up the jumble of crushed pyrite in the middle. Hm ... I think it's likely I'll wind up making a pair for myself, too!

handmade holiday 2014: green garnets and copper


Wow, it's been a long time since I've posted. Cass and I came down with a really bad headcold that kind of wiped us out from Thanksgiving until just recently. That woodland birthday party? Cancelled. I have a few more bits and bobs from it to share. Actually, we were able to freeze a lot of the things I made for it. So we'll have a ridiculously fancy post-holiday game day feast in a week. That'll be fun.

But in the meantime, I've been loading up with freelance work and job interviews, so much so that  holiday presents have kind of fallen by the wayside. Many things will be late this year! But for now, at least, I have a few things done - and a friend's recent post  on her own blog has been great motivation to get back in the saddle.

So, without further ado, let's begin the parade of handmade gifts for this year (mixed with the remnants of my birthday-party-that-wasn't). I made this pair of copper earrings with green garnets for a dear friend with a maybe slightly more minimalist and edgy/cool sense of fashion, but similar color preferences. So, I confess, I made the earrings I would love to wear. =) She slipped them on tonight as we worked in the kitchen to make (and then eat!) a fancy dinner together and I loved the way they echoed her long, elegant neck!

Thursday, November 20, 2014

woodland birthday: moss


For years, I've wanted to throw a party with a woodland theme or woodland aesthetic. This year, I decided, I'd finally do it - for my birthday. There aren't any woodland-themed party activities; really, this is just about setting a pretty table of pretty bites for an afternoon of games and maybe a holiday movie, after a midday ice skating session.

Click here to see the wedding idea from Amy Wallen photography that is my table inspiration for this party. I went to the florist today to order three "pink mink" protea for the floral arrangement. I think the other bits and pieces - the eucalyptus, the limonium, the roses, even the ranunculus - shouldn't be too hard to find at my local grocery stores.

But you'll see there's a lot of moss there in that picture. And I thought that moss would be nice to tuck around platters and serving dishes on a table full of appetizers, to give a woodsy feel. And  since I live in the Pacific Northwest, with the shade of a grove of doug firs guaranteeing a regular crop of moss in the backyard, it was a simple matter of going out and harvesting clumps of moss and cleaning it (this did, however, take me an entire afternoon and evening), and then preserving it, to have a good amount of moss for my table (not quite as much as I'd like, but that's okay - I'm just being forced to practice moderation here... or heck, maybe I'll just go dig some more!)

I found the instructions for preserving moss at The Art of Doing Stuff. Basically, the moss is cleaned, allowed to dry, and then soaked in a mixture of vegetable glycerine and denatured alcohol (two parts glycerine are mixed with 1 part alcohol) for 10 minutes, then drained for 10 minutes, then left on paper towels to dry for a few days.

Above, the moss is clean and dry. Below is the preserved moss. What's nice about this (as contrasted with just drying moss) is that it stays nice and green, and it's pliable. Also, any little clumps of dirt that were stuck in the moss through the preserving process are just falling out as the moss dries, which is pretty cool. The downside, however, is that it kind of stinks like green, wet seaweed in our kitchen! I might transfer all of it outside tomorrow to air and see if that helps!


Wednesday, October 15, 2014

a day off


Last week, in the face of some very obvious physical manifestations of stress, I took a "day off." I didn't work on professional development stuff. I didn't apply for jobs. I didn't fuss with emails or spend the day online.

Instead, I took a walk in the park in the morning sunshine. I picked up pretty leaves, and dipped them in wax, using this tutorial from Martha Stewart. I  tied them up with thread to a piece of driftwood and hung them where they would flutter and be pretty and generally get in everyone's way as they walked into the kitchen. 


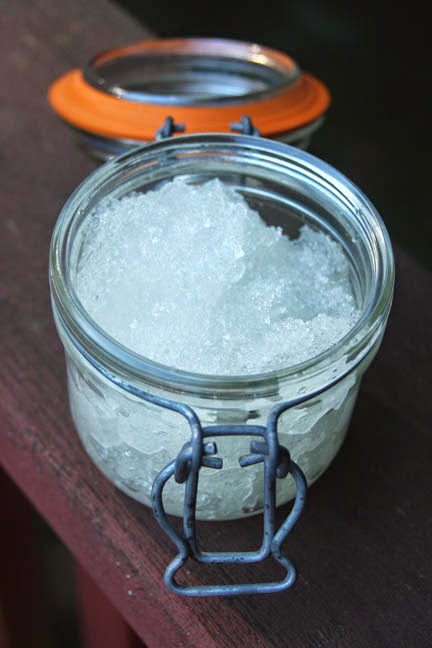
I  also made some salt scrub for the shower. I had all the ingredients - salt, glycerin, essential oils - on hand, so I quickly mixed this up and now I'm happily scrubbing away. I love salt scrubs. They're great exfoliators; this oil-free recipe from ModernSauce is the one I use. There's a great little shop for glycerin, oils, wax, salts, and other ingredients for making homemade bath products in Seattle, called Zenith (it's on Roosevelt, a couple blocks south of NE 65th St). I have salt from the dead sea in these; the crystals are slightly larger and more rounded/less sharp when you scrub with it. It's like washing with tiny pebbles! I scent mine with some essential oil from the bay tree (laurel nobilis) because I love the herbal, slightly masculine notes of that scent.

Thursday, May 29, 2014

a postcard ... for somebody else!


We invited some new friends over for dinner and board games a couple of weeks ago. It was fun. They actually sent us a thank-you card afterward. I think Cass and I were both a little intimidated. "Oh. So that's how we do this?" (I mean, c'mon. This is Seattle. People wear jeans to the opera. We've made four-course dinners and then eaten them - with guests - in front of the TV, while watching a movie, noshing out of a communal bowl of truffled cauliflower risotto...things are different out here. Casual.)

So, last week they reciprocated: we went over to their place for dinner and games. Great food, great drinks, fun game. They gave us a little plastic bear as a kind of ... gee, I don't know. Favor? Joke? - to remember the dinner by.

"Hipster battle!" I joked to Cass. I pulled out one of those leftover marbleized postcards and made a thank-you-postcard featuring the bear. With a bunting. Because, you know, it's cute.

Okay, it's really cute. I made a high-res scan before sending the card, and I'm thinking of printing six- or eight-packs of these and including them in the Months and Years shop. What do you think? Would they sell?

(Also, still working on the second Months and Years dress. I will NOT cover the rest of the clothes in time-consuming appliques. But it's beautiful! And I'm getting there! Photos in a few weeks, I hope!) =)

Tuesday, May 20, 2014

sugarcoating


In this year's second installment of preserved flowers: candied lilac blossoms. I never realized you could candy lilacs; honestly, I always thought they were poisonous! But then I saw Chelsea's post about infusing drinking water with lilac blossoms, and that got me thinking. A little digging turned up plenty of recipes for candied lilacs - and the process was the same as one uses to candy other flower blossoms or petals: a dip in egg, and a dip in sugar, then allow to dry.

A few tips for the lilacs:

I did go out and buy dried egg whites to make these. Dried egg whites will be a bit less gelatinous when you mix them up, and that's ideal when coating delicate flower blossoms - you just want the thinnest coating of egg white. I also read that using dried egg whites eliminates any risk of salmonella, so that's a nice bonus. I found a little tub of powdered egg white at the home cake decorating store near my house for $13; it was a bit more than I'd been expecting, but oh well!

I also made superfine sugar for this, by running regular sugar through my coffee grinder for a few seconds. I think this step is important, too: just like the powdered egg whites, finer sugar means you can get a smoother coating of the blossoms (so that the shape and color of the blossoms won't be overwhelmed by a coating of thick crystals).

Otherwise, it's very simple to candy lilacs, though it's time consuming (I must have spent about 7 hours candying two and a half pans of lilacs over two days): rinse and pat your blossoms dry and remove blossoms from the stems/bunches. Using a pair of clean tweezers, dunk a lilac bloom into lightly beaten egg white (or reconstituted powdered egg whites). Tap the blossom lightly on a paper towel, twice, to remove excess egg white. Next, tap your blossom (face down) into a bowl of superfine sugar 3 or 4 times. Sprinkle sugar over the back of the bloom, then pick it up again (still using your tweezers). Tap your tweezers against the side of the bowl about three times, with some pressure, to shake excess sugar loose from the bloom. Place on a tray or pan lined with paper towels, face down, to dry overnight. A heavier coating of egg white will require an extra day to dry.

Once dry, carefully remove the blooms from the paper towel - they may stick a bit; gently work them loose, being careful not to break the petals (if you do break one, you must eat it! Darn!). Store in an airtight container in a cool, dark place (exposing the blooms to light will cause their fragrance to fade faster). They will last for some months, though the scent and flavor will fade over time  - so, ideally, use them soon after making them!

How do they taste? They taste just like lilacs smell. It's marvelous! Cass says they taste a bit like peeps, with a floral finish. (I've never had one of those marshmallowy treats, so I can't vouch for this, but two of our friends exclaimed he was right, so there might be something to that observation!) They're delightful, and delicate. Imagine them sprinkled over a cake with other flowers - or cupcakes, or floating atop a floral cocktail, or garnishing a panna cotta (this is what I want to do with them!). =)


Saturday, March 22, 2014

a good cause


So, it just so happens that a handful of former students of mine (some from a decade ago!) all work with (indeed, they created it!) Boundless Arts Performance Collective here in Seattle, a nonprofit organization that works with local foster youth, providing them with "an environment in which [they] can realize their creative potential, build self-confidence, and discover their personal strengths." Next Thursday, March 27, Boundless is hosting a charity event, "Home is Where the Art Is," to raise funds for the organization. I can't say enough good things about the intelligence, determination, and good hearts of the women I know at Boundless, and so I was honored when they approached me and asked if I would consider contributing a basket of goods to the auction.

So, I got to work: above, I lined a little wood box with a piece of Cole and Son's popular "Woods" wallpaper, and painted eight heavy watercolor postcards with sherbet citrus hues.


The postcards were all printed with my "moon phases" lino block.


I made a pair of pretty earrings from rose quartz and hand-hammered brass, with simple 14k gold fill shepherd's hook earwires. (I'll be making more of these for the Months and Years shop, by the way.)


That pretty soft "scarf seven" that I posted last week joined the pile, and as a final touch, I put in two jars of marmalade - one made with Seville oranges and vanilla bean, and one made with bergamot.


And here's the finished contribution: it's kind of like a lovely little Easter basket of handmade indulgences for a grown woman. And if you're in Seattle, don't forget you could take this basket home on Thursday night - so come to Fremont and join Boundless at their charity auction! It's all for a wonderful cause!

Wednesday, March 19, 2014

and two more!


Oh, it's so so fun. Above, shot in a rare bit of spring sunlight (what is THAT?), I made this warm red-brown, purple-spattered beauty last week.


And last weekend, I made this one, which is another super-favorite of mine. It's palest robin's egg blue with a warm golden bronze, shot through with intense bursts of bold pink. It made me think of the sea: cool water and warm brown sand. Cass says it reminds him of a cloudy autumn day - or a cup of tea with cream swirling through it. And the good news? This beauty will be for sale. I'm going to put it up in the etsy shop when I open it - so even if you aren't shopping for baby (or if you are!), there might be something pretty to catch your eye at Months and Years. And on that note, I pledge to get back to work on that second baby dress tonight. I spent some time this weekend hand-sewing the detailed scalloped-edge sleeves to their silk linings.... oh, it's going to be so pretty! 

Thursday, March 13, 2014

burning the west wind

A friend of mine recently wrote to ask if I could find a source online where she could purchase a print of "The West Wind" by Ann Brigman, an early 20th-Century American photographer who was famous for photographing strong women in the nude in the Californian landscape. I had never heard of Brigman before, and I'm so glad that now I know her name, and know a little of her beautiful work. In my mind, I am grouping her together with Frida Kahlo and Georgia O'Keefe as women whose lives - as much as the objects they made/produced - were forms of artistic personal expression.

I would love - LOVE - to get my hands on a copy of her book of photographs and poetry, titled Songs of a Pagan, someday - but they seem to go for a lot of money on the vintage/antique book market.

Anyhow, I failed to find a place to order a print or copy of Brigman's photo. And in the meantime, my friend slipped on some ice and broke her wrist. I wanted to do something to cheer her up while she was in pain and dealing with the frustrations of limited mobility. So, I decided the next best thing would be to take this old 11" X 14" wood panel I had lying around that I hadn't used for anything, get out my woodburning tool, transfer the basic image to the panel and burn away.

It is out for delivery now, apparently in blizzard conditions. I hope it makes it to her! - And that she likes it!

Sunday, March 9, 2014

and four more


Scarf dyeing continues in earnest around here! Above is a basic immersion-dyed scarf ... that I'm thinking of overdyeing ... it's gentle and soft, in ecru, seafoam and gold ochre. It's like the first daffodils, in scarf form. But it might be too gentle, too subtle, too ... complaisant? I'm debating going back and trying to give it some kick. I had a bit of a breakthrough last night, technique-wise, and now I want to go back and re-do a lot of my previous stuff.


This was actually the second scarf I did. I had a sunny afternoon and I wanted to experiment with sodium alginate (a thickener) and see if I could create a thick gelatinous dye that would sit on top of the fabric and dye it in blobs rather than seeping into it. The problem is that the scarf had been soaked in soda ash first ... and my dye definitely wasn't thick enough. There are still spatters, but it's more of a droplet-texture in what turned into a very bubble-gum-pink scarf. Might overdye this one, too, though I'm kind of taken with its saccharine sweetness.


For my fourth scarf, I got to folding (with Cass' help). It was a real pain, but the results are wonderful, so graphic and bright and geometric. I like it. I want to do more of these. Next time, I think I might fold the scarf (with some help from the iron) before soaking in soda ash solution; although that might make it difficult to fully saturate the scarf. I don't know, these are things to think about and experiment with.


And then the fifth scarf, which is currently my all-time favorite dye job. This is not an economic way to dye scarves, as it uses a lot of dye, but I love the intensity of color. In person that peach is so bright as to almost seem fluorescent - and that's applied OVER gunmetal. This scarf is like a stormy sky shot through with brilliant orange. I love it. The color combo is great. I'm attempting a duplicate now, and mulling over other color combos that might turn out so brilliantly together. I guess this is just proof that you should always keep experimenting!


Friday, March 7, 2014

back in the dyeing saddle


Last weekend a friend asked if she could buy some of my dyed scarves; she thought they'd made good thank-you gifts for some friends who had recently thrown her a fantastic party. Of course I jumped at the opportunity! I told her I'd given all the ones she'd seen away, but that I could dye some more. I ordered another dozen scarves (figuring it would be better to dye a bunch and then let her pick and choose her favorites), which arrived on my doorstep a couple days ago. I started dyeing yesterday with the green-purple-rose-bronze one you see above (forest green  + warm black, who knew?).

I'm currently experimenting with the next scarf. I had an idea last year about using sodium alginate to thicken the dye to a jelly consistency and then throwing it across the scarves a la action painting/Jackson Pollock. As it's sunny out today, I figured there's no time like the present to give it a go!  A little bowl of dye is setting up in the back room as I type. I'm going to try combining this with the low-immersion technique and see what happens! More soon!

Saturday, February 22, 2014

hand-painted envelopes


It was great fun to put these very pretty little envelopes in the mail today, like a party in my mailbox. Inside these envelopes are leftover postcards that I printed for project 52 two weeks ago:

  
As I mentioned here, I was curious if anyone wanted the leftovers. I wasn't likely to send them myself (I mean, sure, eventually I would have used them, but I'm more interested these days in using things up and clearing out the scraps and leftovers than hanging onto them). Two of my facebook friends asked to claim them. I wanted to be sure that they could actually use/send the postcards if they wanted, so this meant packing them up and mailing them.

The problem was, I didn't have any 4X6" envelopes in which to mail them. I asked my husband to pick some up for me on his way home from work one night. He agreed, but as he looked in vain for them, he asked me over the phone, "Why do you need to buy these, anyway? Can't you just make some?" "You know, you're right," I said. "Okay, I'll just make some."

Of course, on Friday, when I started to think about making envelopes, I started thinking about really MAKING envelopes ... as in, making them unique and special and fun and pretty ... as in, hand-painted envelopes! Of course! And why not?

I printed out a free 4X6" envelope template from here (and in case this information is useful, a 4X6" envelope is an A4 size).

I centered the template on two pages torn from my 12X16" sketchbook (so I had a bit more paper to work with; I wanted larger flaps so I'd have a larger glue-able area when I assembled the envelope, just for that extra sturdiness and reinforcement).

I scored and folded the edges, then unfolded it and set about painting the envelopes with large abstract flowers in acrylic paint. It was fun, and the perfect activity for my Friday afternoon combination of physical exhaustion (I've been working out regularly and not sleeping well of late; the combination left me drained by Friday) and rainy weather.


I let both of the envelopes dry in front of heating vents for a little while, then folded them up and glued them using acid-free bookbinder's glue. Of course, you could just use tacky glue or even Elmer's glue. Just take the time to spread the glue (with a brush or your fingers - I used my fingers) evenly over the areas to be glued, and to wipe away excess so it doesn't squish out of the edges and accidentally glue the sides of your envelope shut.


 After gluing, I pressed my envelopes between two heavy books (I always use my hardbound editions of the complete works of Shakespeare ... no disrespect to the Bard, but they're the heaviest books I own!) for a couple of hours to help flatten out any warping caused by the painting. And there they are! Aren't they pretty? I've got to do this again sometime; it really make the mail feel special - though I suppose these days, just getting any mail at all feels pretty special, doesn't it?


Tuesday, December 24, 2013

handmade holidays: architecture-print tees


Once again, this year's installment of architecture-themed printed T-shirts. This year, I settled on a Corbu (Le Corbusier) theme for my darling modernist. I took the design on the black-and-purple tee from a poster series of "minimalist architecture." It depicts the windows in Corbusier's Notre Dame de Haut, from the inside of the building. I printed out a large version of the poster, cropped the text from the bottom and cut the window forms out to make a stencil. There was some bleed-through at some places on the delicate stencil, alas. The tomato-and-orange stencil of Corbu worked a bit better, and certainly was less time-consuming to make.

I also was working on a funny non-architecture tee, but couldn't settle on a design to surprise Cass. I ran some of my ideas by him last night and he laughed heartily, so perhaps I'll do some more printing this spring, just for fun.