Monday, December 30, 2013

project 52:14


last week project 52 was on the road with a soft winter landscape shot from the car's passenger-side window near Olympia and a sketch of the pattern from my favorite section of The Great Wall project at the south end of Tacoma as we headed home from Portland.

Hard to believe that was only a week ago. I've been sick since Christmas, and it feels like it's been soooo much longer because I hate being stuck in bed all day.

Tuesday, December 24, 2013

handmade holidays: architecture-print tees


Once again, this year's installment of architecture-themed printed T-shirts. This year, I settled on a Corbu (Le Corbusier) theme for my darling modernist. I took the design on the black-and-purple tee from a poster series of "minimalist architecture." It depicts the windows in Corbusier's Notre Dame de Haut, from the inside of the building. I printed out a large version of the poster, cropped the text from the bottom and cut the window forms out to make a stencil. There was some bleed-through at some places on the delicate stencil, alas. The tomato-and-orange stencil of Corbu worked a bit better, and certainly was less time-consuming to make.

I also was working on a funny non-architecture tee, but couldn't settle on a design to surprise Cass. I ran some of my ideas by him last night and he laughed heartily, so perhaps I'll do some more printing this spring, just for fun.

Monday, December 23, 2013

project 52:13


Last week I was stuck; it was already Monday evening, my postcard was overdue, I was stressed and uninspired. And then my friend Jorah shared a snippet of poetry from Hafiz and suddenly I had a plan - Hafiz to the rescue!

I put the whole poem on the back of this postcard:

Admit something: Everyone you see, you say to them, "Love me."

Of course you do not do this out loud, otherwise someone would call the cops.

Still though, think about this, this great pull in us to connect. Why not become the one who lives with a full moon in each eye that is always saying, with that sweet moon language, What every other eye in this world is dying to hear?

Tuesday, December 17, 2013

handmade holidays: a wreath for the door


I seem to be playing around with new kinds of wreath-making of late. Though I first learned to make small bundles of greens, and to affix them to a wreath form, hiding the bundled ends of one bunch with the free tips of another, lately I've been braiding and weaving and tucking branches. I made this wreath out of a wire hanger from a dry cleaner (that I shaped into a circle; I used the twisted hook to form a little loop to hang it on a nail on the door), and two whippy cedar boughs. I affixed the two boughs to the wire loop (and to each other, and then braided the branches on each bough around the wire and the bough itself. Then I wove sprigs of seed pod eucalyptus (from which I'd removed the leaves) into the cedar base, and tucked branches of rosehips (leftover from my Thanksgiving table flower arrangements - below) in among the eucalyptus. I'm not sure that this is as secure a way to make a wreath, but I like the slightly wilder and looser aesthetic, and it seems secure enough for something that doesn't have to travel or be handled by many people.


(for Thanksgiving I paired greenish/pinkish hued white roses with orange mums, rosehips, and some kind of greenery that I couldn't identify. It was simple, but I liked the effect with the beeswax tapers and the blue runner.)

Monday, December 16, 2013

project 52:12


Project 52 is getting into the holiday spirit this week; ink on paper. I had to photograph it on my washer just to get a little watery sun - it's definitely winter!

Sunday, December 15, 2013

handmade holidays: libations


I don't think I ever posted a photo of the last round of cider! It was so good (and so affordable, and so pleasantly low in alcohol) that we already made another batch and I have six pounds of apples to grind up tomorrow and start another round of fermentation. The process comes from Yvette Van Boven's lovely little cookbook, Home Made Winter, which Cass bought for me last year and which is a really fun resource for these dark indoor months. I haven't tried making butter yet, but I want to - soon!

This process gave me the heebie-jeebies a little bit, at first, just because there is no boiling or sterilization of the food, just simple fermentation. Grated apples (cores, peels and all) are placed in a sterilized bucket with a bit of water and allowed to stand for seven days (you stir the mash daily with a clean spoon). After that, the solids are strained out and you add sugar, fresh ginger, and cinnamon sticks and let it stand another day. Then it is strained and put in a bottle. We put up four bottles in the fridge  to ferment (Yvette Van Boven says you can let it ferment for up to two months - our last bottles only made it a month before we drank them) and are drinking the leftovers tonight.

I really like this low-tech cider. It smells and tastes a bit of yeast (no yeast is actually added to the mash; the only yeasts present are the wild yeasts on the apples' skins), and over time it develops great fine bubbles (after a month, the bottles would fizz over fantastically when they were opened).

Thursday, December 12, 2013

yuletide flavours: candied orange peel

 
M husband has a Satsuma addiction. Every December, I break out a tray or a bowl for our coffee table, and each week he fills it with stem-and-leaf satsumas (so pretty and cheery!) or even the piled contents of a 5-pound box. In addition to being cheery and delicious, they provide a key ingredient for my holiday baking: their peels.
 
I save the peels for a few days (I gradually fill a Ziploc bag that I keep in the crisper drawer in the fridge) then candy a big bunch of them at once. Candying orange peel isn't difficult; it's one of those tasks that takes more time and patience than skill. The first step is to simmer the peels in water (just enough that they have room to move around) for 2 hours, until the white pith becomes waterlogged. Then drain the peels and scrape away the pith using a spoon (I sometimes have a knife on hand, too, in case there are stubborn bits). Then cut the peels into strips (or tear into bits, whatever you prefer) and begin the candying process.
 
Combine equal parts water and sugar to make a simple syrup. Make sure you have enough simple syrup so that you can submerge all of your peels in it. Add the peels and simmer over medium-low heat (stirring occasionally to prevent any sticking or burning) for about 40 minutes. Strain the peels out of the syrup (you can save the orange-infused syrup for making cocktails!) and place on a rack to dry.
 
My peels normally remain a bit sticky if I don't roll them in sugar, so today I am trying a little alteration to my usual process. First, I simmered the peels for about an hour in the syrup, instead of 40 minutes - I kept an eye on the pan and waited until the syrup was starting to get really reduced before I drained the peels. I laid them out a cooling rack that I'd placed over a baking sheet lined with parchment paper, as you see below:
 

 - that's a lot of peel!

Finally, I put the whole pan in a low oven (about 200 degrees Fahrenheit) for another two hours. I've just turned the oven off and left the door open, to continue to dry them in the warmth. I'll report back if this results in a candied peel that is easier to work with for baking.

Now, I've just got to dig out all the lebkuchen and pfeffernusse recipes I've been saving. I don't think pfeffernusse needs orange peel, but lebkuchen does! I haven't had a lebkuchen in so long; it was my favorite as a child. In fact, one year, I named two stuffed bears I received for Christmas "Bel" and "Kuchen." =)

Monday, December 9, 2013

project 52:11


Still life with turkey carcass, in acrylic and ink. I was about to turn the Thanksgiving turkey carcass into stock last week when I realized I needed a subject for my weekly postcard.

 It's already Monday and I still haven't quite figured out what I'll do this week. Oh well. I'll come up with something. The cat is sick with a UTI (we think; the emergency vet wasn't able to get a urine sample to confirm) and I feel kind of lost and helpless, seeing her in pain and not being able to do anything to help. Poor thing. I hope the antibiotics will help - and soon.

Friday, December 6, 2013

handmade holidays: moon phase wrapping paper


I also used my moon phase lino block to make some homemade wrapping paper. I can't believe how expensive wrapping paper is these days! And it seems half the time you aren't even buying a big roll of it anymore, just two small sheets. I realize that wrapping paper is kind of wasteful ... so I keep trying to come up with ways to reuse things we have or to use recycled materials to make wrapping paper a little more eco-friendly. For this sheet, I rolled out some brown kraft paper and used drafting dots to affix it to my kitchen table. I made some faint guidelines with a straight edge and a pencil to help me keep the block straight as I printed. I used Speedball's Fabric Block Printing Ink for this. The ink can be used on paper, but it does take a while to dry, so I can only make one or two sheets at a time, and then I have to tape them up to the back of our utility room door to dry for a week. (Hm. I'm thinking I should probably hurry up and make some more so I can start mailing gifts next week. It's getting to be that time of year!).

It's very pretty, isn't it? I used this first sheet to wrap a gift for a family member and tied it up with a bit of deep hunter green satin ribbon, and I like the colours together very much.

Thursday, December 5, 2013

moon phase blouse

 
Here it is: my moon phase blouse! As you may recall, I carved a lino block with a made-up print of moon phases a couple weeks ago. I used it to print one of my brother's birthday postcards in project 52, to make some of my holiday wrapping paper (I'll post that tomorrow; I didn't realize I hadn't shared it here!) and then on all the pieces of this blouse.
 
The pattern is Vogue's V8598, the same one I used to make my "peacock" oxford shirt in 2010. I'm not convinced that I like it as much without sleeves; I might rip the sleeve facings off and print a couple more pieces of cloth and sew up sleeves in another week. We'll see. 
 
The ink I used is Speedball's Fabric Block Printing Ink. It's a water-soluble oil-based paint, which means it cleans up with soap and water. This ink (more of a thick paint) is not heat-set after printing like most fabric paints; instead, you let it cure for a week before washing. I did find, as some others have reported, that even though I waited 10 days before washing, that there was a noticeable fading of the ink. I tried hand-washing this at first, but the shirt still felt a little powdery, and I noticed some of the ink was rubbing off on my fingertips as I handled it. So, into the washing machine - and that's when the colour faded. However, it isn't coming off on my fingers anymore, so I really think it was just a matter of time. I don't mind the faded look for this project; I think it works. But this is something to keep in mind if you are going to use this ink!

Tuesday, December 3, 2013

Finally! My Irish Triple Chain quilt

 
I swore I'd finish hand-quilting and bind the edges before November was out this year, but I didn't quite make it; still, December 1st isn't bad. Finally, my Irish Triple Chain quilt is done. I was inspired to make this by Alicia's work over at Posey Gets Cozy, one of my very favorite blogs that I've been reading for years (Alicia's sweetly thoughtful and optimistic posts got me THROUGH grad school). I bought fabric and started cutting it up at the beginning of my 2012 summer vacation; I decided to take a whole week off from the dissertation at the start of the summer and just make things again. I managed to put the whole quilt top together pretty quickly, but then there was still the task of hand quilting the whole thing. And of course, that was my last summer writing the dissertation, and this task got shunted to the back burner pretty quickly.

But this weekend I knuckled down with lots of BBC period dramas (both films and TV miniseries) and cranked out the last of it. The results are lovely. The photo above was taken with the quilt thrown over a curtain rod; the sun glinting through makes it look quite yellow, but I do like the stained-glass effect of seeing some of the seams through the glow. The photo below gives a better idea of the colours: grey blues, a little turquoise, and then warm rose pinks, a touch of bright red, and deep burgundy and brown, on a creamy ivory background (it's backed in a gold calico with a print of delicate sprigs in coral and soft brown). It was always meant to be an "early autumn" quilt. 


And now that I've finished it, of course I've convinced myself I should do another one;  I even have images saved to a file on pinterest, of a vintage quilt someone found and posted about on their blog. I want to recreate that original.  We'll see; I have plenty of holiday gifts to finish (I'm still tying tassels for scarves) before I embark upon another big project like this. There's also the expense of it - making a quilt is not an inexpensive undertaking! I might just spend this winter stalking fabric sales and trying to accumulate the yardage I'll need.

Monday, December 2, 2013

project 52:10


Though I debated adding some colour to this, I decided in the end to keep it simple last week: this is a view of the underside of our neighbourhood's old water tower (no longer functioning, but maintained as a landmark). I used a woodburning tool on a birch postcard.

Saturday, November 30, 2013

handmade holidays: merry and bright


I've had a remnant of Ralph Lauren red plaid kicking around in my fabric stash for years. I bought it to make a shirt for myself, but I felt the plaid was a little too small scale (though I still have enough leftover to make a sleeveless oxford, so I may do it after all!) for an adult's garment. So I made this little 2T dress for a friend's daughter (pattern is Butterick's B-4054). The only change I made to the pattern was in the sleeves: I made a separate casing, rather than turning up the sleeve's hem to make a casing for the elastic, as I knew I wanted to trim the sleeves with bias tape (in a contrasting white/blue/green/red plaid) that I'd fallen in love with at my local fabric store. I used it to trim the skirt, neckline, sleeves, and to bind the seam where the skirt meets the bodice. This dress is full of careful details: most of the seams are French seams, the skirt seam is tacked down, invisibly, by hand, and the invisible zipper is the best one I've ever done. Children's clothes are so small that I always feel like I have time to indulge in the special finishes.

After sewing the dress, I embroidered a little laurel garland to the chest in ivory cotton sashiko thread, using a chain stitch for the stems and herringbone stitch for the leaves.

Here's another picture: it's a bit less romantic with the light filtering in through the window, but it'll give you a better idea of the dress. I can't wait to wrap this little cutie up and pop it in the mail for a special little girl's Christmas!

Wednesday, November 27, 2013

handmade holidays 2013: chamomile liqueur


I'm pretty sure that my old high school buddy's wife doesn't read my blog. If she does, man, am I ever ruining the surprise. I had said something about growing chamomile on facebook this spring and she asked if my husband (who's got a real knack for mixology) might be able to dream up a chamomile cocktail for her, as she loves chamomile. Well, I thought, I've got to figure out a way to make a chamomile spirit. My first attempt was a bust: I used Roman chamomile (a low-growing groundcover chamomile), I think that was the first mistake. When I later reopened the jar of roman chamomile flowers that I'd dried and saved, I noticed a faint bitterness to the otherwise sweet chamomile scent. That bitterness also came to the forefront when I infused the flowers for a couple of weeks instead of a couple of days - too long, I learned, for chamomile.

So, this second time around, I used German chamomile (the standard, upright plant that people tend to think of when they think of chamomile) that I grew this summer. I only steeped the flowers for five or six days (I steeped in vodka). Then I added honey (lots of it) and water (because the alcohol content of many sweet and flavoured liqueurs is lower than the vodka's standard 40 proof). I watered down and sweetened to taste, taking tiny sips from a teaspoon after each addition until I'd reached a point that seemed to best complement the sweet and sunny chamomile flavor. The benefit of sweetening with honey (as opposed to, say, a simple syrup), is that the combination of honey and chamomile is so traditional and expected - and the amber colour of the honey only enhanced the sunny yellow colour of the liqueur.

I poured it into an old absinthe bottle and corked it. We haven't figured out how we'll get this down to Oregon yet, but we'll get it there - and a little ageing in the bottle with the honey won't do the spirit any harm. In the meantime, I've got maybe one ounce of this liqueur left over, and I've challenged Cass to dream up a cocktail and try it out. He's only got one shot, so it's got to work on the first try; I figured we'd jot the recipe down on a tag and tie it around the neck of the bottle for gifting.

Tuesday, November 26, 2013

a new hat

 
Inspired by Giles Deacon's F/W 2013 show (some images below), I knitted myself an oversized beanie this autumn. (For reference, I propped the hat up on a 14-inch-high vase for this shot. It's quite large, about 28 or 30 inches in circumference at the base.) The hat is made with Lanaloft Bulky wool yarn and knitted on size 19 needles. There 60 stitches (I worked a 3X3 rib pattern) that gradually reduces to a 2X2 rib pattern, then is sewn together at the top. It is accented with two metallic silver leather feathers that I cut by hand (unlike Mr. Deacon, I don't have access to a fancy laser cutter), affixed by a leather thong to a cast silver twig (from the silver twig shop on etsy). Mine isn't quite as long as some of the hats below because I didn't like the really long floppy shape, but it tucks down a little bit in the back and generally makes my head look like I've got a giant green mushroom for a hat. I love it!


Monday, November 25, 2013

project 52:9


well, now that I realize I haven't posted anything since last week, I feel a bit bad. I've got a few things photographed that I just need to upload and share with you - a hat, some finishing touches for holiday gifts that I've been tying up, and though that shirt is just about done, I realized I may have to tear off the sleeve facings and put sleeves on it. I just can't tell if I like it without sleeves or not. I think I need to get Cass to weigh in and make the decision for me.

In the meantime, at least I'm keeping up with project 52. Last week a friend posted a picture of a bare tree on facebook and it reminded me of the way nerves branch in the human body. So I sketched the tree (roughly) and then painted over it in a mix of acrylic and gesso.

Monday, November 18, 2013

project 52:8


for week eight, a quick painting of Mt. Ranier at sunrise is overlaid with a print from a moon-phase lino block that I carved (and later this week, I'll show you the shirt I'm making with that lino block).

Friday, November 15, 2013

DIY Imperial Prism Earrings


Time for another anthro DIY! Above are the "Imperial Prism Earrings," currently sold at anthropologie for $138. I think it's a great, bold earring for holiday parties and the quartz points make it feel rather wintery to me. These guys are made from two quartz point beads, a bunch of little brass spacer beads, and rhinestones in two shapes (12mm squares, and 15x7 mm navettes) mounted in brass sew-on settings with two holes. A single piece of wire feeds through the quartz point, then the two sides go up through the two holes in the sew-on setting. There are 15 brass spacer beads on each earring - four on each wire between the quartz point and the square rhinestone, one on each wire under the navettes, and one single brass spacer at the top. After stringing on the last of the navettes, the two wires are pressed together, the brass spacer bead is fed on, and they are made into a simple loop closure and attached to a lever-back earring with a small rhinestone accent.

 
Here's my DIY version. I wasn't feeling the pink-and-white colour scheme of the original, so I swapped it. I was hoping to do green navettes with an opalescent white square rhinestone, but I couldn't find the components in the right size. I settled on jonquil ( a pale chartreuse) navettes and peridot squares. These actually cost me more than I'd expected-  and the surprising expense were the brass spacer beads, which were $0.40 apiece. As I needed 30 of these spacers to make the earrings (and I bought two extra, in case I lost one in the carpet while making), there was no way I was going to be able to make these for my usual "1/10th of retail price" standard. Alas. I used leftover quartz points that I had on hand, and gold-plated shepherd's hook earrings that I had on hand to keep costs down - all in all, I think I spent about $25 on materials. That's a bit more than my usual, but still, a far cry from $138. And I like them in green. I think they might be great for spring, too.

Monday, November 11, 2013

project 52:7


this week, Cass suggested I use the postcard to do a study of a pomegranate, since I've got one in my next painting and I need practice (sorry, David  - do you feel used?). So, week seven is a pomegranate sketch (just using a mechanical pencil I found in the pen jar) that I stabilized with a bit of fixative before going back over it with a little wash of acrylic paint to punch it up with a hint of the deep dark colour of those ruby seeds.

Pomegranates are the perfect winter fruit, aren't they? No wonder it's the fruit that Persephone ate in the underworld - they're so dark and mysterious, all that brilliance and zest hidden in the labyrinthine folds.

Friday, November 8, 2013

kitchen alchemy


In addition to the fruitcakes, I've got a few drink infusions aging in out-of-the-way places around the kitchen, too. First, I wanted to try making a birch bark liqueur, because I adore root beer and licorice and all those sweet root/pod spice flavors. I infused dried birch bark in vodka for a week or two (I wanted to stop before it took on a bitter edge, as I'd read that birch bark is most commonly used as a bittering agent!). I strained the bark out and put the vodka back in a dark cool cupboard for another week (or two? hard to remember). Last week I added a couple of tablespoons of honey to sweeten it and put it back in the cupboard. I shake it up every other day, and plan to let it sit and mellow for a month or so before I try it. The ageing process (especially once you've added a sweetener) really changes a spirit; it mellows it and gives it body. So, we'll see. I'll report back closer to the holidays as to whether or not this was a success (and if it is, you can be sure that I'll be making more).
 
So much for the jar on the left. In the little glass bottle on the right I'm infusing saffron into gin. I ran across this cocktail on the anthropologie blog yesterday and wanted to try it, but I couldn't justify going out and buying a bottle of Bourdier's Saffron Gin (for one thing, money's tight; for another, I don't like to buy a whole bottle of something before I can taste it and make sure I'll like it). So I simply poured off 4 ounces of gin from a bottle I had on hand and placed several generous pinches of good Spanish saffron (I stocked up when we went to Granada last year; I wish I'd bought even more, it's so much cheaper there), then poured the gin over it. I suppose it's a little low-tech, but I hoped that my heavy hand with the spice would make up for the fact that I didn't have a better technique. Within an hour or two, the gin already had a strong forward scent of saffron, so it seems promising. I'll strain the saffron out in a day or two - again, I want to be careful that no bitter edge will creep in. I left the chamomile flowers infusing in my would-be chamomile liqueur too long and the result was a powerful bitter. I've learned my lesson!


Last but not least, I'm trying out the recipe for homemade apple cider from Yvette Van Boven's Home Made Winter cookbook (wow, it's currently out of stock!). I have to admit, I feel a little wary of this method: grated apples are combined with water in a bucket and left to ferment for a week. There is no pasteurization/boiling beforehand, no tablets are added to kill harmful bacteria (and thus, no yeasts are added to replace those which might have been killed by such a tablet). I didn't wash the apples beforehand. That might sound crazy, but I knew that if the apples were going to produce fermentation without added yeast, I would need to leave any wild yeasts that might be on their skins intact. So .... no washing. I just took this photo - it's day five. All the little bubbles are kind of cute and cheerful, aren't they?
 
After a week, you're supposed to strain out the solids, and add sugar, fresh ginger, and cinnamon sticks to the liquid. Then it goes back in the bucket to continue to ferment for another day. Then it is poured into sterilized bottles and goes into the fridge. Van Boven says you can drink it immediately or store it for a month or two - and that it will become more effervescent the longer it sits. I save beer bottles with Grolsch-style  closures for reuse for picnics and such, so I think I'll sterilize those and use them for the cider ... and we'll see? I'm definitely curious, and I'm excited to finally be trying this process out!

Tuesday, November 5, 2013

and again, new DIY earrings


I fell in love with these iolite and brass earrings from Portland, Oregon vintage/artisan shop Demimonde. Of course, at $140, they're way out of my price range. (Note: they're labeled the "lolite" earrings; I assume that's a typo and that they're actually made of iolite. I've never heard of "lolite.")

Time to DIY! The construction is simple: two pieces of chain are joined at the top by a jump ring. At the bottom, twelve little flanges/drops/pendants of brass hang from a head or eye pin (or simple piece of brass wire) that has been threaded through the loops of this very fine chain and its ends bent over (once) and hammered slightly to flatten them (optional). The trick here is to get a very fine chain so that you can simply bend the head pin/eye pin/wire over to secure it. With a wider chain, the pin would slip through the loops and the whole thing would come apart in a second. The iolite is a tube bead, with a brass spacer bead on either side, also strung on a head pin/eye pin/bit of brass wire that is threaded through the loops of the chain and folded back on itself. You do have to be careful to count your loops so that the iolites don't hang in a lopsided fashion.

I was looking for perfectly neat little brass drops/flanges/pendants and couldn't find any, so I picked up some small square brass rod (hollow center) and hammered it flat to make my own. These earrings are about 1" wide, so those flanges/drops/pendants are only 1/12" each. I couldn't find anything so narrow, so I simply reduced the number of flanges in my earrings to seven. I couldn't find brass spacer beads that were quite the same dimension as my iolite tubes - oh well! And I chose to use a bright brass (instead of a tarnished/aged brass) chain for the sides of the earrings, as I wanted to have a slightly more unified look overall.

Cost to me? A $10 strand of iolite tubes (I have a couple dozen left; I only used six of the beads), $1.20 for the chain; $0.80 for the headpins, $1.30 for the brass spacers (I always buy a few extras, in case I lose one during the project), and $1.79 for the brass. The ear hooks and jump rings are gold plated and probably a bit more expensive, but I already had them on hand from previous projects. So all in all, about $15 for a pair of earrings (with lots of leftover iolite to make more).


I discovered that I really like working with the square brass rod. I can hammer it on my anvil to uneven thicknesses and it still has a fairly regular width/profile. I like the uneven, rough-hewn organic effect. I'll have to play with it more in the future. And while making these flanges does take some hours, I rather like the effect of shaping, trimming, and filing so many small pieces. Fiddly work like this is calming for me. Maybe some more earrings (or necklaces?) are in my future - certainly, the 1920s aesthetic at Demimonde is totally inspiring. I might finally have a good use for a string of green garnet stones I bought last year.

Monday, November 4, 2013

project 52:6


a little seasonal cheer: I rendered our Halloween pumpkins, and trusty spider (that Cass made out of foam core, and which we rig up over a corner of the porch every year with our trellis netting for a "web") in a little papercut exercise.

Thursday, October 31, 2013

good samhain


As the trick-or-treaters march through the neighbourhood, filling the air with the sound of their excitement and happy chatter, in another quiet room the candles burn. Happy Halloween and Good Samhain to all of you out there. And here's to absent friends.

Monday, October 28, 2013

project 52:5


last week I was peeling carrots for dinner on card-making day. Postcard of my hands at work: woodburned birch, with washes of acrylic.

Wednesday, October 23, 2013

handmade holidays 2013: fruitcakes

 
Last month, I started my fruitcakes - a bit later than I'd intended, actually; I should have started them as soon as the temps started to dip. Oh well. They're ageing now in our back room - a utility room/add-on to the house that we rent which is not insulated (and which stays nice and cold all through the winter).
 
I use this recipe from epicurious, but with a few changes to make the cake a bit more traditional (by which I mean, more like medieval European recipes).


For one thing, I don't use glaceed fruit - the recipe doesn't need the extra sugar, and dried fruit is fine.  Here's the mix I use in my fruitcakes (it's also a bit more than the recipe calls for): 2.5 cups chopped medjool dates (fresh, not dried), dried apricots and dried figs*; 1 16-oz bag of yellow raisins; 1 16-oz bag of dried tart Montmorency cherries; 1 cup of Thompson raisins; and approximately 1 cup of finely chopped pickled citron. This year, because I grew and candied angelica stems, I substituted approximately 1/4 cup of chopped candied angelica for the citron. Next year I hope to increase the angelica content even further, as I love this flavor.
 
[*That's 2.5 cups TOTAL of dates/apricots/figs - not 2.5 cups EACH. You can adjust the mix according to your preference.]
 
I combine all of my dried and fresh (the dates!) fruits in a large bowl and pour approximately 1 cup of liqueur over them - whatever alcohol I plan to use to infuse ("feed") the cakes during the ageing process. This year I used a mixture of brandy and homemade elderflower liqueur from this summer. Then I cover the fruit and let it stand at room temperature, stirring occasionally, for at least a week. If the alcohol is entirely absorbed by the fruit (it usually is), I add more and continue the ageing process.
 
Then I bake the cakes. There are a few other substitutions that I make to the epicurious recipe:
  • Since my fruit usually absorbs all the alcohol during the initial soak, I add another 1/2 cup of brandy to the egg/butter/sugar mixture in the recipe (there is no alcohol to drain off the fruit).
 
  • Since I'm using more fruit than originally called for (and since I've made it a bit wetter by soaking it in alcohol for a week in advance), I usually have to use  between 1/3 and 1/2 c. flour to coat all the fruit before adding it to the batter. I also do NOT pat the fruit dry. That would remove the alcohol - which seems decidedly counter-productive.
 
  • I didn't take the 1/3 - 1/2 c. of flour "out" of the 1 1/2 c. flour in the batter recipe. I just put the full 1 1/2 c. of flour into the batter (so, I'm making a bit more cake here).
 
  • I use 1 c. of almond flour instead of toasting and grinding blanched almonds myself. I probably end up with a bit more flour than I would if I had used whole almonds and toasted and ground them myself. That's okay - again, I'm making a little more cake than the original recipe calls for.
 
  • Last but not least, I prepare 8 mini loaf pans (greasing, laying waxed paper in the bottom, and greasing the paper) instead of one big pan. This way, I get 8 small cakes, which are easier for giving. The expense of brandy and fruit that goes into this cake means that it costs almost $50, all told, to make and age this cake; I'd much rather be able to spread the wealth around, rather than only have one really expensive cake to cut into and share.


Here they are going into the oven; after they're done baking, I let them cool for 30 minutes before removing them from the pan (per the instructions), then I let them cool completely before wrapping them in plastic wrap for the night (this keeps moisture in the cake). The next day, I unwrap the plastic, wrap the cakes in two layers of cheesecloth, and pour a half-shot of brandy over them. I wrap the wet, cheesecloth-wrapped cake in a layer of plastic wrap (to keep the moisture in) and then place them in a plastic tub. This tub has a loosely fitting lid that keeps insects out, but doesn't fit so tightly that the cakes develop mold. I pack all 8 cakes into this box and place it in a corner at the back of my back utility room closest to the door (the coldest part of the room).

From now until yuletide, I'll feed the cakes once a week: to feed them, I unwrap the plastic wrap, carefully pour a full shot of brandy over each cake, and then re-wrap in plastic and return them to their cold storage. When the bottoms of the cakes start to feel a little soggy or damp, I'll flip them so that the liquid runs back through the cake to the top for a week. The cakes must not be allowed to dry out - and they need to stay cool! After about three months, the cake is ready: it tastes strongly of brandy and plums; it's very delicious, but best to enjoy when you won't have to drive anywhere!

Monday, October 21, 2013

project 52:4


do you have a favorite song for autumn? I always always always listen to Nick Drake's Time of No Reply in September.

Friday, October 18, 2013

harvest 2013: quince jam


back when we made that weekend escape to Index, and I picked all that quince, I had no idea how much time I'd spend peeling, coring, and cooking it down. Okay, maybe I had some idea. But I was so excited about free quince that I accepted the challenge.

I didn't grow up eating quince, so it's still kind of a new flavor for me - and Cass, too. The last time I cooked quince, we tried it poached in a lemony white wine syrup. We hated it. Threw it out. Didn't help that I hadn't cooked it long enough.

This time, I tried something different; when talking about quince one day with some Arab friends, they burst into exclamations. For one thing, my friends didn't know what the English word for the fruit was (and since I've encountered relatively few people who even know what it is, I can understand why they hadn't yet had the opportunity to learn this word). My friends were also excited to share memories of quince slices in syrup, made with rosewater and cardamom. So, when I came across Izita's recipe for quince preserves on Tumeric and Saffron, her Persian cooking blog, I figured, fair enough, let's do this.

Since I wasn't sure of the variety of my quince, and therefor couldn't predict whether they'd hold up to cooking in syrup, I just cooked my quince wedges down in water and lemon juice until they were softened, then blended them into a thick puree in the food processor. I returned them to the pan and started adding sugar, rosewater, and cardamom to taste - a little bit at a time at first, but then I got more and more adventurous as my confidence grew.

The end result is a thick jam, almost a paste. The rosewater and cardamom give it just the right oomph, bringing out the beautiful pineapple-like floral quality of the quince itself. I gave Cass a spoonful right out of the pan and he raised his eyebrows in approval. Though it's still a new flavor to us both, this time we won't be throwing it out. I have a few ideas about how I'll use this. My grandmother used to make a pineapple cream cheese pie; it was a 30s-era recipe with a tangy pineapple base layered under a mix of cream cheese and milk and eggs. I used to request it every year in lieu of a birthday cake. I think the quince will lend itself well to something similar, paired with creamy or custardy layers. It might also be really good flavouring to add to a panna cotta, now that I think of it. I'd also like to give this quince curd brulee tart recipe from British Larder a go, and if I find I still have a lot left over, I might pour some into an oiled or parchment-lined pan and dry it in the oven for a day or two, and see if I can't produce something like membrillo at the end. Lots of options! I'll be sure to share the successes.

Thursday, October 17, 2013

wiksten tank


I've been meaning to try out Jenny Gordy's sewing patterns for a while now; I finally got around to buying her downloadable .pdf pattern for the Wiksten tank a couple weeks ago and thought I'd try it out in this knit fabric first. It's a nice organic bamboo rayon that I dyed orange (the bias trim is 100% cotton interlock knit, dyed in the same dye bath). I did make some slight adjustments to the pattern - as it looked a little oversized to me in the photo, I created some shaping through the waist by nipping the pattern in from the medium (my size) to the xsmall just below the bust and then gently curving the seam back out to the medium at the hip.. The fit is perfect: a little slouchy, but not quite so shapeless (though I suspect the silky, lightweight jersey helps there). If I have enough fabric, I'm going to try cutting one out of some remnants of chartreuse coloured silk charmeuse I have in my stash - and cutting it on the bias, so it will drape nicely. I'll report back, if I do try it and if it works!

Tuesday, October 15, 2013

an autumn kind of mood


a week or two ago, I was out on a walk and noticed a weird straggly hawthorn (are there prone/creeping hawthorns out there? Must be!) growing along/over a robust clump of juniper. The waxy blue juniper berries, alongside those bright orange haws stuck in my mind ... and I resolved that one of these days I'd go back to this patch (which is growing outside a fence, on public land, alongside a busy road) and clip a few branches and make a wreath.

I kept promising myself I'd go and do it - soon, soon - until today, when I dropped all my plans and spent an hour taking the walk and putting this together. I just couldn't stop thinking about those colours.

Monday, October 14, 2013

Project 52:3


a little contrasting imagery and materials: a little gesso blocks out the silhouette of evergreens, which are actually made from a mosaic of 1/2-inch squares of [deciduous] autumn leaves.

Friday, October 11, 2013

DIY Pearl Embellished Strand


Above is De Petra's "Pearl Embellished Strand," which was selling for $378 at Anthropologie. It's sold out now. But you could always make your own - for about $30. I spent a bit more, but that was because I bought a whole string of pearls instead of just buying 15 or 16 individual pearls - both because it's a better price, generally, to do so, and because I came across a string of cheaply-marked freshwater pearls at the bead store.
 
 
In this necklace, the pearls are strung on beading thread (or silk, if you're feeling fancy). Bits of mauve-grey thread (probably silk) are twisted around this thread (the one on which the pearls are strung) two or three times, and then the ends are tied in a square knot. Then one or two clear glass beads are slipped onto the ends of each of this accent-thread, followed by a brass crimp bead which is crimped to keep the accent thread from unraveling (and to keep that clear glass seed bead secure. Wash, rinse, repeat - between each of the pearls. The heavy brass beads are probably from Africa - if you've got a local bead shop that imports African brass beads, you should be able to find similar beads (same goes for those rough-hewn, heavy brass rings/rounds). If you're in Seattle, Beadworld has these items. I used deerskin lace (1/4" wide) for the basic stringing material, because it's lighter weight and easier to work through those brass beads - but you could also use cowhide, and save a few pennies.
 
Admittedly, the ends are way longer on my necklace than the original. It would be easy to just slide those three metal beads on each end up a few inches, re-knot, and cut off the excess, but for right now, I'm leaving the ends long. I like the way it looks. This was a fun project, totally the kind of thing that can be made in an afternoon craft session.

Tuesday, October 8, 2013

Project 52:2


I was going to make quince jam last week. Instead, I spent the whole day carving a lino block of the quince, with a mason jar standing behind them. I still haven't finished - the jam, I mean. Oops! Maybe today?

Monday, October 7, 2013

make do: a little dye to the rescue


A week ago, I hand-washed this "vintage cotton tank" by J. Crew with a green sweater. The dye ran from the sweater, and though I pulled the tank from the dye bath immediately and rinsed it, it had the faintest of green splotches on it (that I did not discover for a few days).

I was so disappointed! I love this tank; it fits like a dream. I thought I might as well try dyeing the dank to salvage it. I soaked it in leftover soda ash solution for a couple hours, then squeezed the soda ash out.
 
I lay the tank down in my bathtub and smoothed it flat. I folded it in half lengthwise, so that the side seams were touching. Then I folded it in half lengthwise again, folding the side seams back over towards the center fold. I then accordion folded this long strip of tank top in triangles. When I was done, I placed the stacked triangle in the old casserole dish I've used for dyeing silk scarves. I poured green dye along the three edges and let it stand for four hours before rinsing.

 
The end result is this great line pattern that wraps all the way around. It's pretty cool - and while it's not quite as business-appropriate as the original tank may have been, I'm happy to have salvaged it for any kind of wear.


Tuesday, October 1, 2013

a new experiment in practice: project 52


I have an older brother who just celebrated a birthday last week. I've spent the month of September casting about for a good, original present - something that wouldn't take up unnecessary space in his NY apartment, something that would be personal, something that he would enjoy.

I settled on postcards. I would send him a homemade postcard once a week for this whole year. I'll document it here, though I'm going to post them about a week behind, so that he gets to enjoy having the first view.

So here's Project 52: 1. Woodburned birch postcard with acrylic. Dying Queen Anne's lace at the end of summer, set against a hillside in one of my favorite Seattle parks.

Tuesday, September 24, 2013

weekend escape


On Saturday we went to Index, to help out my in-laws who are replacing their deck, and to generally visit. This is how I always think of Index: the promised land. It's so incredibly beautiful up there - the crisp mountain air, the trees, these gorgeous peaks. We are so very lucky to have family there. I love getting to visit.

 
Eventually, we ran out of work. The deck supports had been braced with the six available 2x6s, and I'd put a second coat of stain on all the decking boards. I started putting a first coat on some other boards, but then they needed to sit for at least two hours before we could do the second coat.
 
So, what's a girl to do? Why, strip a branch of the neighbour's quince tree of unwanted fruit, of course! This look of pure joy brought to you by not having to pay $6-per-pound. And childhood nostalgia - we grew up with quince trees, though my parents never harvested the fruit. Still, I love the smell. I used to climb and play in our quince trees, even into my teenage years.

 
My in-laws encouraged me to go harvest whatever I wanted from the garden, as much as we could possibly take. "We're sick of it," they said. It's been a great year and they were tired of having to pick at this point. I get it, I really do. Even I was feeling this fatigue, earlier in the year, and I didn't have the gardens to tend that my in-laws do.

 
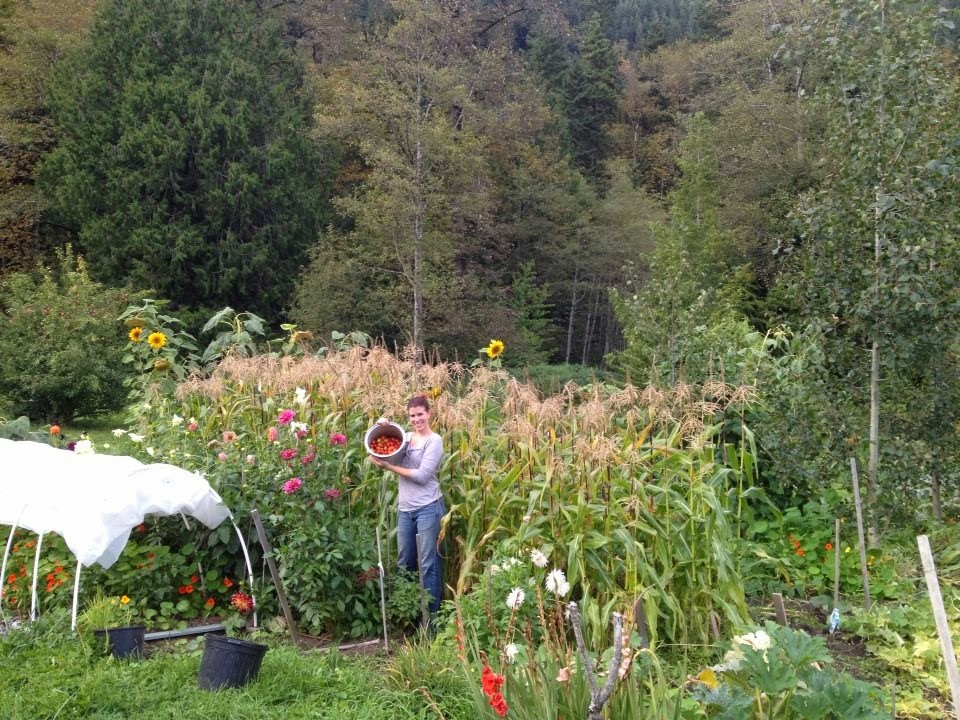
This is one of their gardens, tucked into a piece of property left vacant since a historic building collapsed during one of the big snowstorms in the winter of 2008. My in-laws live across the street and just till under the soil, add compost, and grow stuff there, since no one else is doing anything with it. It's a beautiful space: tons of dahlias, gladiolas, corn, big pumpkins, onions, potatoes, tomatoes, peppers, several kinds of squash, beans, sunflowers (grown for the birds, actually), nasturtiums tumbling everywhere .... and at the back is the sheer rock cliff that locals call the "town wall." (I find the understatement amusing.)
 
After harvesting we went for a nice family walk together, out through the woods and back along the river. We stopped on the bridge into town and watched the salmon spawning in the shallows. It was pretty amazing to see these noble creatures, who are so important to the culture of our region. They were so far from their ocean homes, and so close to death, returning to the place of their own births to mate and die. The river in Index is so crystal-clear that you can see right through to the stones at the bottom. Already hree silver bodies lay there, motionless. I wonder how many are there now.
 
 
Peggy told me to pick plenty of dahlias to bring home - for both myself and my neighbor, who is also a big dahlia fan. This is my half. Aren't they stunning?
 

I turned a bag of apples (some 10 or 15 lbs.) into a deep dish apple pie and four quarts of apple sauce (I processed three of them and put one quart in the fridge for immediate eating enjoyment).

That pan full of tomatoes that I'm holding in the picture above, combined with all the tomatoes I picked in my own garden in the past week, cooked down to two quarts of thin sauce. It'll need a fair amount of cooking to make a Bolognese sauce or a marinara for lasagna or pasta, so I'll probably actually keep these quarts and use them to make tomato soup this fall. I plan to sauté an onion and some cloves of garlic (chopped), then throw in some stock (probably chicken) and one of these quarts, and cook until it has reduced by half. I'll run the whole thing through the blender to make it smooth, and then add a pour of cream or milk and season with salt and pepper to taste. Maybe I'll even throw in some herbs - thyme, or rosemary. We love tomato soup and grilled cheese sandwiches in this house.

I'm kind of lazy and don't like to skin or juice tomatoes when making sauce, so I simply cut the larger tomatoes in halves (or quarters), threw them in a pot with a little water, and cooked them until everything was soft. Then I put them through the food processor and blended up the skins with the fruit. I put the puree back on the stove and reduced it by half, then packed it up. These tomatoes were acidic enough that when Cass took a little bit of the puree and added cream to it (to make himself a little bowl of "tomato soup" for dinner), the cream curdled. I probably didn't need to add citric acid to the jars, but I did, anyway (1/2 tsp per quart jar), just to be on the safe side. I processed for 15 minutes in a hot water bath after canning.