Showing posts with label gardening. Show all posts

Sunday, August 10, 2014

a shifting sense


Lately, it seems, I've got autumn on the brain. Seattle's basking in the heat of August - the most reliably warm and dry month of the year - but I find my nose picking up the scent, here and there, of ripe decay, the richness of fruit melting into soil, and I can feel myself on the alert for the spicy incense of rotten leaves and the first hints of smoke from nighttime fires.

I've a few kitchen projects going on today, and they're all rather nice, little, simple things, the kind of things that require more sitting time than working time - and which make a girl feel rather accomplished at the expense of a minimum of effort. Nice, that. First, I'm experimenting with a new bitters (for drinks), using rowan berries (the very ones pictured above) as a bittering agent - it was a bit of a lightbulb moment a few weeks ago, when I was thinking about the intractable bitterness of these berries. If they turn out well, I'll recount the whole process on the blog later. For now, here's a pretty picture of rowan, in my harvesting basket, in a lucky photo that looks rather lovely and picturesque. And autumnal!

And below, those bounteous late-summer beauties: dahlias. My mother-in-law sent us home from the mountains yesterday with three cut-off plastic milk jugs, each stuffed full of dahlias. I made three arrangements for our house, and two big ones (in quart-size mason jars) for my neighbours. I snuck out of the house in my nightgown, a towel still wrapped around my wet hair, and left the jars on their porches, a sweet surprise for this morning. I've since added a brilliant, hottest-pink spidery dahlia from my own garden to the arrangement on the right, tucked just above the ginormous dinner-plate one. I love all their orange, coral, and purple brilliance. So happy, so carefree, so saturated with color.

A new postcard to show you tomorrow; I'm off to attend my haul of huckleberries, picked by the side of a mountain lake yesterday. Ah, perhaps it's not so autumnal, not yet. Just me, as ever, leaning into this, my favorite time of year, that shifting late-summer/early-autumn.


Monday, July 14, 2014

week of jam, day five: alpine blackberry, two ways


Ah, alpine blackberries. So tiny, so sweet, so floral, so much harder to pick than those Himalayan monsters that run rampant everywhere in the northwest (I like those, too, though; those are the ones I grew up eating, and they will always be a quintessential flavor of summer, for me). They're ripening early this year, too; normally we don't pick them until August, but we went up to Index two weekends ago to pick the thimbleberries and found ripe blackberries (and huckleberries - also ahead of schedule!) and picked a couple pints. I made two kinds of blackberry jam: a plain one (with just a little dash of rosewater at the end, to play up the floral notes in the berries), and then blackberry-sage. I used to love blackberry-sage tea as a younger adult. I haven't had any in years, but I still think of the flavor combo fondly. So, I packed up a few jars of the blackberry jam and set them in the canner to process and then went out to the garden and picked some fresh sage, washed and chopped it, and stirred it into the remaining jam in the pot. This decision meant I had to run my hot water canner for an extra 10 minutes (on an 85-degree day, ugh!), but I think it was worth it. Now we have his-n-hers blackberry jam for late autumn - I always like to eat this in November! =)

And yes, I did get up at 6:15am on a Saturday morning to water the garden and take pictures of jam in early morning sunlight! I've been sleeping so little lately, it's kind of awful. I'm getting bags under my eyes from it - but it's so hot at night and so bright so early in the morning that I just can't get a good rest. I seem to wake up at 3am every night now, too. Sometimes I go drink a glass of water, sometimes I get up and go to the bathroom, sometimes I just pet the cat (who, for some reason, hasn't let the heat dissuade her from sneaking into bed sometime in the wee hours of morning and snuggling up into my hip ... I'm kind of glad of it, actually; knowing that we're reaching the end-of-life for her means I want every last little furry snuggle that I can get).


(Here she is enjoying the handwoven, 100% wool rug I picked up at a charity event and cleaned ... clearly, just so she could play with/on it. It's her favorite place to sleep, chase her tail, roll and loll, and of course...those fringes are fun to attack!)


Friday, July 11, 2014

week of jam, day four: blackcap raspberry


I just realized I hadn't posted yet. Seattle's experiencing a real heatwave right now and I am feeling the effects - lethargy, crabbiness, man! I do not like it when the temps are over 80 degrees! And yes, I know, I know: 80 degrees? That's ridiculous! It's so much hotter everywhere else in the world! But here's the thing: do you know what the standing record is for number of days (continuous) with temperatures over 80 degrees in Seattle? Fifteen. Fifteen is the RECORD. It just doesn't get that hot here - and after living more than a decade of my life in this city, I'm glad that it doesn't.

Incidentally, the meteorologists are saying we might be starting a hot streak to break that record right now. We're already at day six. Ugh. As the temps rise, I'm glad I finished making jam earlier this week (oh yes, I still have MORE to share with you), and won't have to fire up the stove and heat the canner anytime soon. Which brings us to today's batch o' jam: blackcap raspberries. We've been growing these berries for a couple of years now, and they are finally starting to settle in and really take off, which is exciting! Blackcaps are native to the northeastern United States, and the nice thing about them is that they can grow and fruit in part-shade. We have a lot of shade in our back garden, so it's exciting to see these guys thriving and their fruit harvest starting to really amp up, despite the lack of light. (But oh, that shady back yard is SO NICE in this heat. Yes, at this time of year, every year, I am thankful for the grove of doug fir that blocks the sun to the south, and the hemlock and stand of cedar which block the sun to the west. I don't have nearly the garden I'd like to have at this house because of  all the shade, but it is ever-so-nice in the summer - and lovely to look at any time of year, of course). Of course, unfortunately for me, one very round, very fluffy squirrel, has also discovered the blackcaps. Every morning, I have to chase him out of the thicket, the little rascal. Stop eating my raspberries!!

But back to the jam. (Sorry - the heat-addled brain is so easily distracted!) So, what do blackcaps taste like? Kind of like a mild raspberry, and kind of floral - in fact, I added a little rosewater to the mix when I made this jam, to play up that quality.

I've got a few more to share with you - I'll try and remember tomorrow, but the thermostat is going up to 90 (wah!), so I might be busy wilting!!

Thursday, July 10, 2014

week of jam, day three: thimblequest 2014!


Now for my absolute favorite wild berry: the thimble berry. Growing in patchy sunlight, with big fuzzy maple-like leaves, thimbleberries might be the most delicate of all the wild berries up here. They're mostly seeds and fuzz, not much juice, fall apart almost as soon as you pick them, and crush each other in whatever particular vessel they're being gathered. As a result, I can't wash these berries before I cook them (the secret's out! Are you grossed out?); if I did, I'd wash away half of the juice. So, we pick them carefully, removing all debris as we go, and then we pick through the berries again as we put them in the pan. But no water is involved.

This jam is also incredibly seedy. It's basically a seed-compote! I suppose if I really wanted to make a beautiful jelly, I could put the mix through a food mill or pass it through a sieve and make maybe one jar of perfectly smooth preserve, but I don't. It took a lot of picking to gather enough berries just to make the eight tiny 4-oz jars (every year, we call our thimbleberry picking "thimblequest," for the hours involved!) of thimbleberry jam I have tucked away in my pantry to last me through this year.

How does it taste, though? Like the brightest, tangiest raspberry you've ever had in your life. Delicious, and so worth that extra effort!

Monday, July 7, 2014

week of jam, day one: strawberry


Yeah, I think I may have enough jam made (and to make) to do an entire week of jam posts. I might also be getting a little sick of jam, as a concept, already - ha! This was the first batch, the batch that kicked it off: our little strawberry patch is really taking off this year. It's nice to see our little garden investments start to pay off, and the back yard start to function like an old-fashioned homesteading garden, with gooseberries, currants, elderberries, strawberries, raspberries, and huckleberries - in addition to veggie beds, kitchen herbs, and the [floral] cutting garden! I already made another batch since this one, and have another bowl of strawberries in the fridge just waiting to be made into a couple more tiny jars.

I don't really have a recipe for this: I wash and halve the strawberries (if they're large), put 'em in the pot with some lemon zest, lemon juice, and the seeds of one half of a vanilla bean. I add a little bit of sugar (for this batch, which only comprised about 2 cups of fruit, less than 1/4 cup of sugar) and cook the fruit gently until it all breaks down. Once that happens, I add a bit more sugar with some pectin stirred into it, cook and check for gel set, and then process in my water bath. The proportions are pretty loose: I use less sugar than recipes call for, and a bit more pectin, and it all works out somehow. I think jam is kind of like pie crusts and biscuits and other things - eventually, you just kind of have a feel for them and you kind of lose track of precise measurements.

I like using lemon zest, lemon juice, and a bit of vanilla bean with fresh strawberry jam; there's something about this combination that really screams, "fair food" (as in, "state fair food" - slap it on a warm, fresh scone and my husband swears it is just like getting a scone from the Fisher Scones stand at the Evergreen State Fair). I'll tuck some of these jars away and they will be forgotten, just you wait and see. He never keeps track of what I put up, and doesn't bother pawing through the cupboard. Then, one morning in early autumn, on a week when we're tired and he's frustrated with something at work and wishing he could just stay home and sleep in, I'll get up early and make a batch of scones and pop them in the oven before I hop in the shower. I'll jump out and catch them just as they finish baking. He'll wonder what the timer is for and what smells so good - and I'll bring him a piping hot scone, slathered with sweet summery strawberry jam, and it'll make everything better.

Wednesday, July 2, 2014

the reddening


In Czech, the word for the month of June is "červen," "the red month," because it is the month in which red things bloom and red fruits ripen. July is "červenec," "the redder month" because even more fruits and flowers are blooming. I'd say what we've got going on in the garden right now fits the bill, though not everything is red. Our strawberries are finally lighting up their slightly-shady garden spot with ruby jewels, the roses are getting ready for their second round of blooming, the black raspberries are ripening, the poppies are actually fading, the dahlias are starting, and the anemones and lilies are fattening up their buds. A time for everything; now is the time for ripening and bounty.

Thursday, June 19, 2014

preserved 2014: candied angelica stems


There now, isn't that a pretty sight? And one of my favorites, too: candied angelica stems. I planted two more plants last year, so I could harvest this year - and lucky me, I planted them in a partly shady area. This plant seems to like a bit of shade, and it definitely likes a good drink of water, which makes it an easy plant to grow here in the wet and gloomy Pacific Northwest.

I have a tendency to grab these when I want something sweet, but I'm trying to save a bunch for my fruitcakes this year (so I made two batches - the second one is still drying). A longer version of this recipe can be found in full here, in last year's post. It's a simple, if time-consuming, process. The stalks are harvested before they turn purple at the base. Leaves are removed and they are cut into lengths (whatever you like! I usually do between 3 and 5 inches. They are soaked in cool water for eight hours, then drained. Bring water and baking soda (1 tsp baking soda per quart of water) to a boil; add the stems and cook for five minutes, then shock in an ice bath. Once cool, drain the stalks and peel the outer layer of skin and strings and discard. Bring a simple syrup (equal parts sugar and water) to boil on the stove. Add the stalks and cook for about 3 minutes. Allow to cool, uncovered, on the stove. When completely cool, cover and place in the refrigerator for two days. After two days, remove the stalks, and bring the syrup back to a boil for 5 minutes. Remove from heat and return the stems to the syrup. Allow to cool, uncovered. When cool, cover and replace in refrigerator. After two more days, take out the pan, remove the stalks, and bring the syrup to a boil for a third time. This time, add the stalks and cook for 5 minutes. Remove from heat, drain the stalks, and place on a baking sheet (or this year, I'm using the drying racks of my food dehydrator) and allow to stand for about 4 days until they are mostly dry. Pack into a jar and store away from heat and light.

Thursday, May 22, 2014

before the storm


The air is stale and still and the humidity's been increasing, palpably, for hours.The sky turned a dark blue - but it wasn't the sky, it was storm clouds gathering in the east. A flat, deep blue - you could almost mistake it for an evening sky, after sunset (but the sun hadn't set yet). The birds are quiet. Everything is waiting.

The storm is due any moment, and it's due to last all weekend and into next week. So, before the rain could spoil my beauties, I gathered them in (some of them, at least): Gertrude Jekyll and Evelyn (both David Austins), Morden Sunrise and some pretty pink thing whose name I've forgotten (I feel like a jerk! Maybe Fragrant Dream, or something like that?). After snapping this picture, I noticed some nice big blooms on the little Knockout rose I've been nursing back to health; I went out and cut a stem with a gorgeous, perfect red bloom and three little tight buds and stuffed it in the vase as well.

I also cut big swaths of avens roses and tucked them into vases and jars around the house; it feels like summer, however dark and lowering the sky, with flowers gleaming in every corner. The best season, the generous season, is upon us. (And if I forget it, I'll have the flowers to remind me - at least, until the sun returns next week!)

Tuesday, May 20, 2014

sugarcoating


In this year's second installment of preserved flowers: candied lilac blossoms. I never realized you could candy lilacs; honestly, I always thought they were poisonous! But then I saw Chelsea's post about infusing drinking water with lilac blossoms, and that got me thinking. A little digging turned up plenty of recipes for candied lilacs - and the process was the same as one uses to candy other flower blossoms or petals: a dip in egg, and a dip in sugar, then allow to dry.

A few tips for the lilacs:

I did go out and buy dried egg whites to make these. Dried egg whites will be a bit less gelatinous when you mix them up, and that's ideal when coating delicate flower blossoms - you just want the thinnest coating of egg white. I also read that using dried egg whites eliminates any risk of salmonella, so that's a nice bonus. I found a little tub of powdered egg white at the home cake decorating store near my house for $13; it was a bit more than I'd been expecting, but oh well!

I also made superfine sugar for this, by running regular sugar through my coffee grinder for a few seconds. I think this step is important, too: just like the powdered egg whites, finer sugar means you can get a smoother coating of the blossoms (so that the shape and color of the blossoms won't be overwhelmed by a coating of thick crystals).

Otherwise, it's very simple to candy lilacs, though it's time consuming (I must have spent about 7 hours candying two and a half pans of lilacs over two days): rinse and pat your blossoms dry and remove blossoms from the stems/bunches. Using a pair of clean tweezers, dunk a lilac bloom into lightly beaten egg white (or reconstituted powdered egg whites). Tap the blossom lightly on a paper towel, twice, to remove excess egg white. Next, tap your blossom (face down) into a bowl of superfine sugar 3 or 4 times. Sprinkle sugar over the back of the bloom, then pick it up again (still using your tweezers). Tap your tweezers against the side of the bowl about three times, with some pressure, to shake excess sugar loose from the bloom. Place on a tray or pan lined with paper towels, face down, to dry overnight. A heavier coating of egg white will require an extra day to dry.

Once dry, carefully remove the blooms from the paper towel - they may stick a bit; gently work them loose, being careful not to break the petals (if you do break one, you must eat it! Darn!). Store in an airtight container in a cool, dark place (exposing the blooms to light will cause their fragrance to fade faster). They will last for some months, though the scent and flavor will fade over time  - so, ideally, use them soon after making them!

How do they taste? They taste just like lilacs smell. It's marvelous! Cass says they taste a bit like peeps, with a floral finish. (I've never had one of those marshmallowy treats, so I can't vouch for this, but two of our friends exclaimed he was right, so there might be something to that observation!) They're delightful, and delicate. Imagine them sprinkled over a cake with other flowers - or cupcakes, or floating atop a floral cocktail, or garnishing a panna cotta (this is what I want to do with them!). =)


Saturday, May 10, 2014

pickled cherry blossoms


Last year, I pinned pictures from Gardenista's lovely DIY post about how to make traditional Japanese pickled sakura, or cherry blossoms. They looked so beautiful and sounded so interesting, but I found her post after the cherry blossoms had fallen for the year, and I wanted to remember to try it again when I got a chance this year. I almost missed my chance - again! But one afternoon, late in the cherry blossom season, as I looked out and admired my neighbours' gorgeous cherry tree, covered in pink blossoms, I suddenly remembered those photos. I immediately called them to ask if I could come over and pick some blossoms to pickle. They laughed, "yes, of course you may. Please take as many blossoms as you would like!" (When we first moved in to this house, our neighbours were so surprised to see me using a sewing machine that they would stop and ask (through the open kitchen window) what I was making every time I hauled it out. After more than three years together, they no longer are surprised by anything: there are new portraits being painted out on the deck all through the summer, traditional marmalades and pickles being made all through the year, I set racks of calendula blossoms out to dry in the sun ... they're used to it all now! (But they still laugh!)

So, the next morning, I hustled out to pick a big tub of blossoms, as I read we had a week-long storm due to set in by mid-morning. The best flowers to use are ones are not fully-opened yet, so that their perfume has not faded. You can include the stems and even some of the young leaves, though I didn't want to remove leaves from my neighbours' tree, so I only picked blossoms.

 First they had to be soaked overnight in cool water to kill any bugs that might be in them and release any dirt or detritus...


... and then they had to be gently set out to drip dry (above).


After that, it was time to get ready to salt. The proportions in Gardenista's recipe are loose: you put a layer of salt in the bottom of a vessel, and start putting in blossoms, adding generous handfuls of salt as you go (she estimates that you should use about 1 cup of salt per gallon of blossoms).


It looks like snow, doesn't it? So pretty. Then the blossoms are gently weighted: I fit a plate in on top of them and added a jar of pie weights, to press them into the brine created by the salt. Then the entire bowl needs to be placed in a cool, dark place for four days. Mine went into a cupboard that buts up against the uninsulated back wall of our house; it's always cool in there, no matter what I do in the kitchen!

After four days, you pour off the brine and then pack the blossoms (which have considerably less volume at this point!) in a bowl with enough umeboshi (or "ume" or "ume plum") vinegar to cover. This was the only challenge in the process: I went down to Uwajimaya and they were entirely out of ALL umeboshi vinegar! We tried a few other import shops before I finally found some at Central Market in Shoreline. Whew! I didn't see that coming! Lesson learned: acquire your ume vinegar in advance, kids!

The blossoms are weighted (again) to keep them submerged in the vinegar and go back into the cupboard (or other cool, dark place) for three more days.


Then it's time to dry! Gardenista stipulates that the blossoms should be spread on a bamboo rack to dry. Lacking that, I realized I could use the trays from the food dehydrator my parents got me for Christmas. (Perfect! Thanks, Mom!)  To keep bugs from getting into them, I draped flour sack towels over them, so that air could still circulate around them.

The blossoms are supposed to be dried for about 24 hours, until they are a little leathery and not wet anymore. I went for about 48 hours (it's so damp here in Seattle)!


And here's the final result! Aren't they pretty? And how do they taste? They're salty, but also kind of fruity, and they have a lovely cherry floral quality (yes, like almond extract!) that fills your palette.


The blossoms are packed in salt and stored in the refrigerator. Gardenista says you can also let some of the blossoms dry out completely and grind them with salt to make sakura salt. I'm going to do that - I even have some Himalayan pink sea salt that I can use, so that it will all be a lovely pink color!

Thursday, May 1, 2014

happy beltane!


It's May 1. On the old European agrarian schedule, this is the start of summer (and hence, the solstice is called "midsummer," and the winter solstice "midwinter"). It's a festival of flowers, those gorgeous precursors of the harvest. I wasn't even thinking about this this morning; as I watered the garden, I picked a few loose  blooms (bleeding hearts, bluebells, avens roses, lilacs) and tucked them together into this vase, loose and free and a little wild - like Beltane itself!

However you measure out the seasons of your year, it's a gorgeous sunny and warm day here in Seattle, and it could feel more like summer. Happy Thursday! Happy day!

Tuesday, October 15, 2013

an autumn kind of mood


a week or two ago, I was out on a walk and noticed a weird straggly hawthorn (are there prone/creeping hawthorns out there? Must be!) growing along/over a robust clump of juniper. The waxy blue juniper berries, alongside those bright orange haws stuck in my mind ... and I resolved that one of these days I'd go back to this patch (which is growing outside a fence, on public land, alongside a busy road) and clip a few branches and make a wreath.

I kept promising myself I'd go and do it - soon, soon - until today, when I dropped all my plans and spent an hour taking the walk and putting this together. I just couldn't stop thinking about those colours.

Thursday, September 12, 2013

harvest 2013: lavender sachets


back in July, I cut my lavender, just as it was starting to fully open. I tied it up and hung it to dry for a week or two. After they'd dried, I worked all the flower buds off the stems and placed them in a big brown paper sack.

I knew I was going to make sachets, and I wanted to stretch the lavender buds a bit further. So this year, I combined the garden lavender with a couple ounces of dried meadowsweet that I bought at Dandelion Apothecary in Ballard.

Meadowsweet is a traditional strewing herb. It was used in the medieval era to sweeten linen cupboards and floors, so I knew it would be pleasant. Its scent is sweet and grassy, about what you'd expect, based on the name.


Then one afternoon I cut out a bunch of rectangles from my favorite toile-printed cotton duck fabric. With right sides of the fabric together, I stitched three sides of the rectangles together, and then turned them right side out. I stuffed each one tightly with the lavender and meadowsweet before turning under the top edge and hand-stitching each closed.

Then we tossed 'em into our drawers. Every time I'm pulling out a shirt, if I can see one of the sachets, I grab it, squeeze it a bit, and toss it into another part of the drawer. The other day my overshirt smelled of lavender and meadowsweet all day. It was wonderful to inhale!

Thursday, July 18, 2013

harvest 2013: lavender wands


Now here's a happy sight: the return of the lavender wands. It is so incredibly satisfying to sit and weave one of these per evening (more than that and my eyes - and patience! - are strained!), thinking of how I longed for them as a child, wishing I knew the secret. It's actually quite easy, and if you'd like to make them, Dharma Trading Co. kindly supplies a tutorial on their website. I went back to my neighbourhood cake decorating store this year and dug around until I found a spool of silk ribbon that I could purchase to use for these this year. Silk ribbon really is my favorite: it's very delicate and lays very flat, so the end result is very smooth. Dharma also sells woven silk ribbon if you'd like to buy some for making your own (bonus: you could also get some acid dye and dye it a very pretty colour - which is half the fun, isn't it?).

These are good for keeping insects - like moths - out of your clothing. The flowers of the lavender are all tucked inside the bulbs of the wands, and if the scent starts to fade, all you have to do is gently massage the bulb to release more of the lavender oil. I have one of these that is almost two years old and still going strong! The only thing you have to be careful of are the stems - they're sharp and fibrous, and could snag delicate clothing. So, tuck these wands into drawers that aren't overfull, or where it will be easy to keep the ends tucked into corners of the drawer, away from sweaters or other knits that might snag.

These are bound for Florida, to a favorite lady-friend =) Miss you, Lady C!

Monday, July 8, 2013

homegrown: blackcap-raspberry-and-black-pansy jam

we started gathering our first real harvest of blackcap raspberries this year. There'll be loads more next year - while only three of our original six canes survived the first year (and the plants don't start to fruit until their second year), those three flourished last year and spread a lot of runners. As a result we have a LOT of young raspberry plants this year - dozens. I'll have a lot of pruning to do next spring!

I combined the few cups of berries I've pulled off the plants in the last few days with some black pansies (and some not-black pansies, as you can see!) to make two little jars of jam. While the blackcaps cooked with just a couple tablespoons of water (to prevent them from sticking to the pan) over low heat on the stove, I ground the pansies with a half cup of sugar in the food processor to make a grainy paste. I stirred low-sugar Realfruit pectin into the paste and then added the sugar-pectin-flower paste to the berries as soon as they'd broken down a bit. Stir stir stir, bring to a boil, and voila! Jam!

I canned and processed the jars for 10 minutes, though five would probably have been sufficient. The result is a beautiful, deep black-purple jam studded with tiny seeds. The pansies add a subtle minty-violet flavor that plays well with the floral quality of the blackcaps.

Tuesday, July 2, 2013

midsummer's crowning glory


we've been having a bit of a heatwave here in Seattle; we set a new record high for July 1 yesterday, somewhere around 90. It's *never* this hot here before August, or maybe September. Wow.

I love it. I can't sleep, but for a few days, I don't mind going without sleep, being tired, even having a bit of heatstroke. I drink iced coffee and ice water and iced juice and make sorbet and we grill dinner or eat slices of chorizo and bread with cold rose after the sun goes down. Since temps over 80 are so rare here, it's still fun. It reminds me of my mother's careful ritual of cooling the house every summer morning: my parents would be up at 4 or 5 am, and my father would begin watering the lawn (a country kid, I grew up on a 1-acre suburban lot with tons of fruit trees and bushes - and a 40-ft deep well that we used to keep it verdant without having to pay the city for water). My mother would throw open all the doors and windows and would use floor fans to rush out any remaining warm stale air from the previous day.

I would get up closer to six, by which time my mother would have dropped the heavy wood-and-textile blinds to block out the heat of the day from the eastern side of the house. The house would be cool and fresh and smell like dew.  We chased the sun at our house in this way,, shutting the west side up before noon, and opening the east side up to the shade of birch trees which sheltered our home (until a silver thaw in February, 1995 snapped them like brittle twigs).


Here, Cass and I only have one fan. But I still find myself waking around 5:30 or 6 in the morning. I jump up and start the watering, like Dad, and shut up the east side of the house before the first rays heat the kitchen, like Mom. Cass sleeps and I open the door off our bedroom and blow cool air in over him, to keep him comfortable for another hour or two until he wakes. By noon, I can open up the east side of the house again, and I close the door to the utility room to shut out the heat reflecting off the deck.

Same ritual, different house. I like it. It reminds me of home, of all the bounty and goodness encapsulated in the words "childhood" and "summer."

Not much to show you today, just a few snippets from my midsummer garden (and tomorrow, a fancy new child's dress, that I've nearly finished!). It's come a long way since March, hasn't it? My midsummer crown has been hung to dry and decorate the living room for the next year. I like the autumn hues; they'll make me smile as summer ebbs and the leaves start to turn.

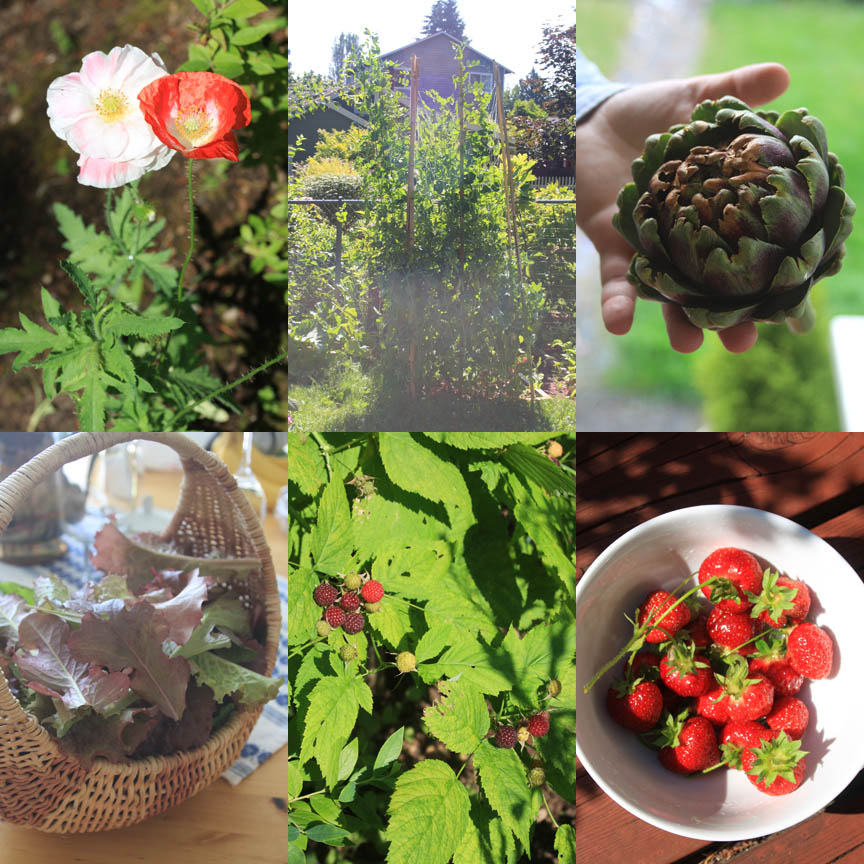
Above, left to right, top to bottom: I planted Shirley poppies all over this year - and Hungarian blue and Lauren's grape poppies, too. Poppies everywhere. So pretty. The peas are over 9 feet tall and have outgrown their trellis. Time for pea-shoot pesto. ANd peas. Lots of peas. And then they need to come down! A caterpillar ate out the center of our first artichoke and made it yucky inside. I'll have to figure out how to keep the buggers out of the rest of 'em; still, we were excited that the plant is producing already, in its first year. We thinned the garden over the weekend, picking a basket of mache, frisee, endive, and various red leaf lettuces that I grew from seed started in February and March (I also pulled up a good bunch of young carrots, to give the others space to grow). The blackcap raspberries are starting to ripen. And finally, a bowl of beautiful ruby-jewels, strawberries from our patch. These smelled like heaven as the pile grew in my hands this morning.

Wednesday, June 19, 2013

homegrown: candied angelica stems


When I first read about angelica three years ago, I was intrigued. A plant named for an archangel, harvested near May Day, and candied? Then I saw candied angelica stems mentioned in a favorite children's book that I reread two years ago. I had to try it.

Angelica cannot be candied in the first year; stalks have to be harvested from a two-year-old plant (or older). Angelica also likes a good deal of water, and I had planted my first plant in a sunny spot and failed to water it sufficiently during our unexpectedly warm summer last year. So! This is the first year I've been able to try it! The stems are still drying, so I can't say yet whether it was a success, but they do look translucent, and they are tasty when I bit into one of the wet strips.

How did I make it? First I cut my stems and soaked them in cool water for eight hours. Then I drained them and blanched them in boiling water (with 1/2 tsp of baking soda added per 2 pints of water - the baking soda is supposed to preserve the colour) for 5 minutes. I shocked them in ice water, drained them, and set about the arduous task of peeling the skins and stringy bits from the outside. (Talk about time-consuming!!) Then I made a  simple syrup (equal parts sugar and water), and added the stems and cooked them at a low boil for 3-5 minutes. I turned off the heat, and let the pan cool. I covered it after it was cool (since the angelica is cooked in gradually increasing sugar concentrations, you don't want to cover the pan too early and build up condensation - let all the water evaporate before covering the pan) and put it in the fridge. Two days later, I pulled it out and strained out the angelica stems. I brought the sugar mixture back to a boil for a few minutes (maybe about 3?). I turned off the heat, put the stems back into the syrup (increasing sugar concentration without overcooking the angelica) and let it cool. I covered the pan, and back into the fridge for another 2 days. Two days later, I took it out again, fished out the stems, letting the syrup drain out of them, and brought the reserved syrup back to a full rolling boil. This time, I added the angelica to the syrup and boiled it for 5 minutes. Then I strained out the angelica stems and place them on the rack (as you see above) to dry. Some recipes instruct you to place the stems in a low oven to help them dry, but I am going to try just leaving them out for four days and see if that will accomplish the same effect, as putting them in the oven can lead to overdrying and making the angelica brittle.

How do they taste? They smell like gin - like gin and floral perfume. It's very nice! I bought two new plants this spring and placed them in the back garden, in a shadier spot that is damper. I'm hoping next year they will rise up nice and tall and graceful and I'll have even more stems with which to experiment!

I'll report back on these in a few days, and let you know if they were a success. In the meantime, my Midsommar cooking preparation has begun in earnest: I baked two cakes today, made a strawberry compote, and am pickling beets just now. I'll make the herring tonight before bed and, since I'm debating baking two batches of rye this year, I'll bake one tomorrow.

Thursday, June 6, 2013

infusions

well! My dissertation has been sent to my committee and I defend it next week. That's kind of crazy, isn't it? In the meantime, I have a backlog of little fun food projects that the start of foraging/garden season has made possible.

When I started harvesting my first doug fir tips, I was reading up on new uses for them; I infused some in olive oil, and I read about infusing one's own doug fir cordial or elixir. The recipe was simple: infuse clean, dry tips in vodka in a cool dark place for at least 2-3 weeks (though I believe long steeping gives a better result when infusing cordials and such, so I'm planning to infuse for a few months), then remove the plant matter and add a bit of simple syrup or honey. Swirl to combine and continue to steep for a few more weeks.

Well. This seems like a thing one could do with a lot of different plant matter, doesn't it? So I'm giving the process a go (above) with elderflowers from the sambucus nigra I have planted on this property (I've planted three, all are different: black lace, thundercloud, and another the name of which I've forgotten!).
 
 
I'm also trying it with chamomile blossoms; if this turns out, I'll give the liqueur away to my friend Kris, who asked (offhand) this spring if Cass could come up with a chamomile-based cocktail for her. And below the chamomile (the vodka's such a pretty sunny yellow colour already!), I'm infusing those doug fir tips.

The gorgeous rose-hued liquid on the left isn't a liqueur at all; it's chive blossom vinegar. Last year, I used distilled white vinegar - and while it was pretty, it was a bit harsh for salad dressings. It was marvelous as part of a pickling brine for my garlic dill pickles, however.  This year, I got wise: I used champagne vinegar. This will be nicely oniony in a vinaigrette for a summer salad!

Saturday, April 20, 2013

another use for big leaf maple blossom

Big leaf maple blossoms can also be eaten raw: they taste kind of like a pea pod, green, but slightly sweet. I rinsed some remaining blossoms we had in the fridge and chopped them into a few pieces, then tossed them with the last leaves of a head of butter lettuce that was in the produce drawer. I added a few leaves of sorrel and some baby greens hanging onto the beets that overwintered in the garden (I sliced these boldly-flavoured leaves into thin strips), and some branches of salad burnet (I chopped these into short segments, and we ate the stems with the leaves). I tossed everything with a little bit of ranch dressing, then drizzled a bit more over the top after plating up the salad.

Simple and healthy, and a good way to stretch leftovers into a light lunch on this rainy Saturday afternoon.

Sunday, April 14, 2013

vernal

 
after an exciting day, weather-wise, Saturday (rain, sun, rain, sun, RAINSUN, hail! lightning! LOTS OF HAIL!), it was really lovely when we got a sunny afternoon and evening today. I cannot believe how pretty everything looks. That picture on the left is my neighbour's yard (taken from our deck). Isn't it like some gorgeous park? Those diagonal lines of gold-green speckles that patter across the trunks of the doug firs are the blossoms of a native dogwood tree. Around seven in the evening, the sun casts some rays through the fir branches and lights up these blossoms. One of my favorite sights of the year. On the right, I've potted up some tomato plants, until I have time/space to get them into the garden properly. And some pansies await transplant into a window box.
 
 
The deck is my one reliable full-sun location. Thus, it becomes my staging zone for all the seeds I'm starting. There are sunflowers, calendula, poppies, and some onions a friend gave me that I separated out. Lots of roses and herbs getting potted up - I'm even giving French tarragon another go (growing it in gravel and poor soil, as this combination has given me the best luck over the last few years).


Another sign of spring: the big leaf maple trees are in blossom!
 
And we (rather, Cass) made beignets. This year, he used a mixture of pancake mix and some semolina flour, and instead of adding water, he mixed it up with some reduced fat buttermilk we had in the fridge and grade B maple syrup. Beautiful.

In other news, after another round of dreams about my professor (one good, one tragic), Cass insisted I write the man's wife and check up. He's made it through four weeks of radiation, with only one more to go, and his sarcoma has started to shrink. Amazing. Almost there. Almost there.