Wednesday, July 24, 2013

and another

 
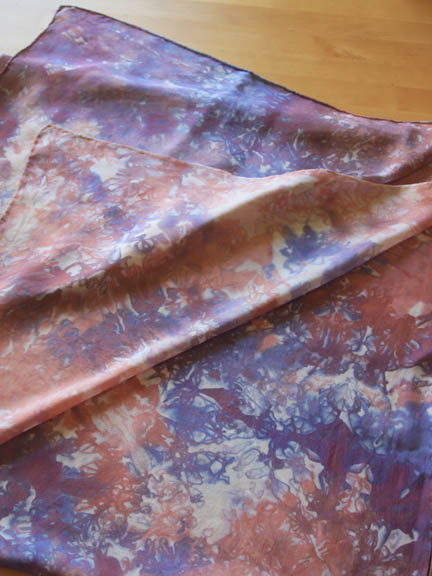
when I first dyed this I was dismayed; it looked like some kind of crazy rainbow (really: red, orange blue purple, faint green..ugh!). As I rinsed it, the colours toned down, but I still wasn't sold. Cass said he liked it, but I thought it was too bold. It wasn't until I had let it dry, ironed it, and then tried wrapping it loosely around my neck that I saw its beauty: the colours patter and play off each other in a most appealing way. Well okay, then!


Here it is, full length. I still think it looks a little crazy when you see the whole like this, but I thought it might be useful to see the full scarf to get an idea of the results I am achieving with Shabd's instructions for the crystalline scarf. Oh! - and the colours used: I used Dharma's fiber reactive dyes in chartreuse and seafoam and procion's fiber reactive dye in warm black (note: not the acid dye, which is meant for silk - this is how I keep getting the crazy purples and reds, I think).

Friday, July 19, 2013

The start of a trend?


Yep, I'm definitely hooked. This one was dyed with navy, brown rose (yes, one colour - what a strange name), pearl grey and ecru. I pressed it, folded it up, and tied it with ribbon.

I guess I've got to find a safe spot to store the Yuletide gifts that I've started making (and I just put in another order for dyes and scarves with Dharma; I want to try making tassels for some of them, too).

Thursday, July 18, 2013

harvest 2013: lavender wands


Now here's a happy sight: the return of the lavender wands. It is so incredibly satisfying to sit and weave one of these per evening (more than that and my eyes - and patience! - are strained!), thinking of how I longed for them as a child, wishing I knew the secret. It's actually quite easy, and if you'd like to make them, Dharma Trading Co. kindly supplies a tutorial on their website. I went back to my neighbourhood cake decorating store this year and dug around until I found a spool of silk ribbon that I could purchase to use for these this year. Silk ribbon really is my favorite: it's very delicate and lays very flat, so the end result is very smooth. Dharma also sells woven silk ribbon if you'd like to buy some for making your own (bonus: you could also get some acid dye and dye it a very pretty colour - which is half the fun, isn't it?).

These are good for keeping insects - like moths - out of your clothing. The flowers of the lavender are all tucked inside the bulbs of the wands, and if the scent starts to fade, all you have to do is gently massage the bulb to release more of the lavender oil. I have one of these that is almost two years old and still going strong! The only thing you have to be careful of are the stems - they're sharp and fibrous, and could snag delicate clothing. So, tuck these wands into drawers that aren't overfull, or where it will be easy to keep the ends tucked into corners of the drawer, away from sweaters or other knits that might snag.

These are bound for Florida, to a favorite lady-friend =) Miss you, Lady C!

Wednesday, July 17, 2013

I think I'm hooked

 
the temps shot up into the upper 80s again yesterday in Seattle. Mercifully, this brought on clouds, thunderstorms, and delightfully fat warm rain - but still, it was too hot to sleep until late at night. After a long day working in the kitchen (I spent the whole day cleaning out the fridge, shucking corn, picking peas, turning old strawberries into jam, making pesto from some of the pea shoots before I cut them all down, etc.), I realized I had enough time to try my hand at low-immersion silk dyeing before bed.


I learned about the process from Shabd Simon-Alexander, whose book, Tie-Dye: Dye It, Wear It, Share It, is available on Amazon for around $17 - $15 for a Kindle edition - right now. If you aren't familiar with Shabd, she is a dye artist whose beautiful pieces have been making waves in the blog world for a couple of years now. Her website contains images of her beautiful wares.
 
Now! To the project! Fortunately, Shabd's publishers have allowed one project from her book, the "Crystalline Scarf" to be circulated on the internet (and this project was the one I most wanted to attempt!). Here's a link to read through the project online. Don't forget to wear rubber gloves!
 
You start by dissolving soda ash in water (1 c. soda ash to 1 gallon warm water) to make a solution in which the scarf (or garment) is soaked. This soda ash solution fixes the dyes in the fabric and helps produce brilliant colours. Shabd writes that 1 gallon of water is sufficient to pre-soak ten t-shirts. Since I was only dyeing one small lightweight silk scarf, I mixed a much smaller amount of this solution: 1/4 c. soda ash to 4 c. water. I put it in a half-gallon-sized mason jar and then shoved my scarf down into the jar and kind of shook it up to make sure it was well coated.
 
The scarf has to sit for 30 minutes in this solution - which is fine, it gives you time to prepare your dyes!
 
Shabd tells us that we should mix about 1 tsp of dye (procion mx fiber reactive dyes) to 1 c. of water. Use more dye powder for darker or brighter colours, as these are more difficult to achieve.
 
I chose to mix up my dyes with chemical water. Shabd's book describes three different chemicals you could use; I used urea. Urea helps dye powder dissolve completely into the water, and prevents flecks and spots of unmixed dye from occurring on your garment. It also helps keep the fabric damp longer, and I was dyeing on a hot night and wanted to ensure that the scarf wouldn't dry out and stop the process.
 
I only made 1 c. of urea-water for this whole project, and used three dye colours - so, I only used about 1/3-1/2 tsp of each of three dye powders. The colours I used were "warm black," "pale aqua," and "peach." The black dyes in the Procion fiber reactive line do not dye true on silk,  fyi. In fact, Shabd has some colour charts in her book that show the different colours a single dye will produce on different fibers. The black looked like it would turn silk purple or red, which was actually what I wanted. So - I used the wrong dye on purpose, to get the colour I wanted.
 
 
This scarf is dyed using what Shabd calls the "scrunch method." She doesn't give a lot of information about what scrunching should look like, except to say that the fabric should not actually be folded over on itself. This was the part I was most worried about messing up. So, in case this helps, here's a picture of my scarf, all scrunched up. You have to take the scarf out of the soda ash solution, squeezing out excess liquid, and then place it in a low rimmed container for this dyeing project - I used an old baking dish that has a sharp chipped edge that I had been considering getting rid of, anyway. This baking dish is maybe 8" wide and 13" long; my scarf is 14 or 19 inches wide and 65 inches long (I think?). So, scrunching was actually necessary, just to get it to fit in the dish. I tried to ensure that I was scrunching it irregularly, so that I wasn't creating regular pleats or something.
 
The high areas will be the light spots in your scarf; low areas will be sitting in pools of dye and become vibrantly coloured. Think about that as you scrunch, so that you are constantly varying the height of the fabric.


Once the scarf is scrunched, you simply unscrew the tops from the applicator bottles (in which you've mixed dye colours) and pour over your scarf. When I was reading up on Shabd's leggings project with Martha, I noticed that she said to apply the colour that you want to be least dominant first. I used this rule of thumb and poured on the peach first, then the blue, then that unstable black dye last.


 here's a side view of the scarf in its dye bath. I was surprised that there wasn't a lot of liquid pooling at the bottom of the pan - and relieved!  I suppose if you did have dye pooling at the bottom, the colours would mix and the scarf would be muddy.

Once the dyes have been poured, the scarf needs to sit and process for 1 hour (see? fast project! 30 min soaking time, about 5 minutes to scrunch and dye, then 1 hour processing, then rinse and done!). You could let it sit longer if you like; the colours will bleed and blend together more. If you want to do this, cover the top of your project with plastic wrap or wrap it in a plastic tarp to keep it from drying out.

After the hour is up, rinse out the dye in cool water and wash with synthrapol (I'm out; I just used Woolite) to remove any remaining particles of dye. Then let it dry - and enjoy!

Remember, when you dry silk, you want to make sure it can hang free and doesn't have any wrinkles in it - or these wrinkles will become a permanent feature of the silk. I hung my scarf over the shower bar to dry, and when it was almost dry, I  took it down and ironed it with a cool iron to give it a nice smooth hand and sheen.

 
There you have it: Shabd's Crystalline Scarf. I can't believe how easy this was, honestly. Maybe it's just beginner's luck, but I think I'm hooked. I wonder if my girlfriends would mind if they all received dyed scarves for Yule this year?


Tuesday, July 9, 2013

keeping my word


Years ago, I promised my friend Jo that I'd make something pretty for her daughter. Her daughter was two years old at the time. Now she's four, is starting to wear a size five, and I figured I'd better cut into this pale mint green raw silk before she got so big I no longer had the yardage to make her a dress!
 
This is Simplicity 2320, a Project Runway pattern. I wanted to make a pretty dress that felt like it belonged on a little girl in a Slavic fairy tale: just add a furry vest and some thick stockings and boots, and she's ready for adventure! I washed the raw silk, which roughs up the hand of the cloth, but I love the nubby softness of raw silk. It's like wearing a beloved childhood blanket or something. I also like the look of embroidery on fabrics with a more organic, home-spun feel; it just seems right. Pretty, without being too precious.
 
I cut a size six, in case anything happened and I got delayed in this project. I'm estimating little S. should be able to fit into this dress by late winter or early spring next year - and won't it be perfect for that time of year? As Cass said, when I first showed him the dress,  "Oh! It's more of a winter dress than a summer dress" (I think he was surprised)


I found this embroidery pattern via pinterest. Seriously, I love pinterest. it saves me the hassle of so many downloaded images, stored on my computer. I did these abstracted flowers up in straight stitch, french knots, and lazy daisy, with satin stitch for the leaves and stem stitch for the stems (there's a real surprise, eh?).
 

Even before I had figured out what I wanted to do with the yoke, I knew I wanted to embroider the sleeves. It just gives the dress that extra oomph! - don't you think? I cut the pattern with the wide three-quarter-length sleeve option, and simply turned the hem 1/8 inch and then 1/4 inch to make a narrow channel for some 1/8-inch braided elastic. Unlike the full-length sleeve option for this dress (which is also elasticized, at the wrist), this version doesn't have a ruffle below the elastic. I like this simpler silhouette - again, I think it's a nice contrast to the precious-ness of the embroidery.

The flowers here are done in lazy daisy, with French knot centers, and the leaves are all done in herringbone stitch. The stems are in stem stitch, again.

Well, now it goes into the mail and hopefully I'll get a picture of little miss S. in her fancy new dress in the months to come. It's definitely too hot to wear during the summer, but hopefully soon!

Monday, July 8, 2013

homegrown: blackcap-raspberry-and-black-pansy jam

we started gathering our first real harvest of blackcap raspberries this year. There'll be loads more next year - while only three of our original six canes survived the first year (and the plants don't start to fruit until their second year), those three flourished last year and spread a lot of runners. As a result we have a LOT of young raspberry plants this year - dozens. I'll have a lot of pruning to do next spring!

I combined the few cups of berries I've pulled off the plants in the last few days with some black pansies (and some not-black pansies, as you can see!) to make two little jars of jam. While the blackcaps cooked with just a couple tablespoons of water (to prevent them from sticking to the pan) over low heat on the stove, I ground the pansies with a half cup of sugar in the food processor to make a grainy paste. I stirred low-sugar Realfruit pectin into the paste and then added the sugar-pectin-flower paste to the berries as soon as they'd broken down a bit. Stir stir stir, bring to a boil, and voila! Jam!

I canned and processed the jars for 10 minutes, though five would probably have been sufficient. The result is a beautiful, deep black-purple jam studded with tiny seeds. The pansies add a subtle minty-violet flavor that plays well with the floral quality of the blackcaps.

Saturday, July 6, 2013

foraged and found 2013: thimblequest!


Finally, I vowed, this was the year: the year I would make thimbleberry jam. I had graduated, had no real claims on my time, and could commit to a day of meticulously culling bushes in the woods for miles, all to source enough fruit for a few jars of jam. My husband said I was crazy; he said it couldn't be done. He protested that thimbleberries were worthless, too little fruit and too much work to pick. Even my father-in-law's enthusiasm waned as the hours dragged on. Heck, even mine did. What a lot of work! But ... we pulled it off! (And then, exhausted and suffering a bit from low blood sugar, I ate WAAAAY too much delicious Mexican food and had to go to sleep for a few hours. Yum!)

What's a thimbleberry, you might ask? It's a native plant in the Pacific Northwest. Though it grows in both sun and shade, it prefers sunnier spots. It's a 4-5-foot-high shrub with broad fuzzy leaves (they look like maple leaves), no thorns, and a few small clusters of very delicate red berries. They look a bit like raspberries, but far more delicate. The flavor, however, is very intense - and also like raspberry.

They're absolutely my favorite wild berry,  but it's hard to find a lot of them that are ripe at one time, and because they are so delicate, many tear and do not come away intact as you pick. In our four-and-a-half hour picking session yesterday we scored 2 cups of red huckleberries  (the season started early this year, because of our warm weather!), 2 cups of wild mountain blackberries (precious treasure!) and about five cups of thimbleberries.

Since we knew we couldn't rinse them without losing half of the berries - they're so delicate that, even packed in small Tupperware containers, they soon crush each other under their own weight. So we carefully cleaned them as we picked, brushing away any debris and sticking to clean, good specimens. I picked through them a bit before dumping them in the pan and making this very simple jam: a little water (just to keep the berries from sticking!), a little sugar, and a bit of low-sugar pectin. That's it!

And the verdict? After tasting it, my husband said the flavor was like raspberries and strawberries combined, together with something ineffable, something wild in the mix. It got a big enthusiastic thumbs-up. Heck, I think he might even be game for more berry picking this summer! The thimbleberry  bushes we picked up in the mountains looked like they were just ripening their first fruits - so if you're interested in giving this a whirl, you should be able to find ripe thimbles (if you know where to look!) for another week or two.